Quantcast
Channel: Free Linux Tutorials
Viewing all 73 articles
Browse latest View live

Installation of CentOS 8 on Ubuntu Server KVM

$
0
0

Assumptions:
A.  Kernel-based Virtual Machine or KVM package is already installed on your Ubuntu Server

Verify:

dpkg -s qemu-kvm

Sample output:
root@ubuntuserver1:~# dpkg -s qemu-kvm
Package: qemu-kvm
Status: install ok installed
Priority: optional
Section: otherosfs
Installed-Size: 89
Maintainer: Ubuntu Developers <ubuntu-devel-discuss@lists.ubuntu.com>
Architecture: amd64
Multi-Arch: foreign
Source: qemu
Version: 1:2.5+dfsg-5ubuntu10.42
Replaces: qemu-kvm-spice, qemu-system-x86 (<< 1.7.0+dfsg-2~)
Provides: kvm, qemu-kvm-spice
Depends: qemu-system-x86 (= 1:2.5+dfsg-5ubuntu10.42)
Breaks: qemu-system-x86 (<< 1.7.0+dfsg-2~)
Conflicts: kvm, qemu-kvm-spice
Description: QEMU Full virtualization
QEMU is a fast processor emulator. This package depends on the
appropriate qemu-system-$arch to enable KVM to be run. It also
includes a script /usr/bin/kvm which runs the appropriate
qemu-system-$arch in kvm mode.
.
Please note that old qemu-kvm configuration files (in /etc/kvm/) are
no longer used.
Homepage: http://www.qemu.org/
Original-Maintainer: Debian QEMU Team <pkg-qemu-devel@lists.alioth.debian.org>


lsmod | grep -i kvm

Sample Output:
root@ubuntuserver1:~# lsmod | grep -i kvm
kvm_intel 176128 42
kvm 561152 1 kvm_intel
irqbypass 16384 3 kvm

B.  VT or Virtualization Technology is enabled

lscpu | grep Virtualization

Sample Output:

root@ubuntuserver1:~# lscpu | grep Virtualization
Virtualization: VT-x

C. Bridge Networking is installed and configured

vi /etc/network/interfaces

brctl show

virsh net-list

Sample Outputs:
Under your /etc/network/interfaces

auto br0
iface br0 inet static
address 192.168.15.19
netmask 255.255.255.248
gateway 192.168.15.17
dns-nameservers 192.168.0.77 8.8.8.8
bridge_ports p1p1
bridge_fd 0
bridge_hello 2
bridge_maxage 12
bridge_maxwait 0
bridge_stp off

root@ubuntuserver1:~# brctl show
bridge name bridge id STP enabled interfaces
br0 888.abcdwxyz23fl no p1p1
vnet0
vnet1
vnet2

root@ubuntuserver1:~# virsh net-list
Name State Autostart Persistent
———————————————————-
default active yes yes

If all ready, we can start creating the Centos 8 Guest or Virtual Machine

  1. Download the Centos 8 ISO image

    wget [ISO location URL]

    Sample Output:

root@ubuntuserver1:# wget http://download.nus.edu.sg/mirror/centos/8.3.2011/isos/x86_64/CentOS-8.3.2011-x86_64-dvd1.iso
–2021-02-15 11:44:35– http://download.nus.edu.sg/mirror/centos/8.3.2011/isos/x86_64/CentOS-8.3.2011-x86_64-dvd1.iso
Resolving download.nus.edu.sg (download.nus.edu.sg)… 137.132.155.197
Connecting to download.nus.edu.sg (download.nus.edu.sg)|137.132.155.197|:80… connected.
HTTP request sent, awaiting response… 200 OK
Length: 9264168960 (8.6G) [application/octet-stream]
Saving to: CentOS-8.3.2011-x86_64-dvd1.iso

CentOS-8.3.2011-x86_64-dvd1. 10%[====> ] 948.81M 33.1MB/s eta 5m 26s

2.  Check if download successfully

qemu-img info [downloadedISOpath]

Sample Output:
root@ubuntuserver1:/var/lib/libvirt/boot# qemu-img info /var/lib/libvirt/boot/CentOS-8.3.2011-x86_64-dvd1.iso
image: /var/lib/libvirt/boot/CentOS-8.3.2011-x86_64-dvd1.iso
file format: raw
virtual size: 8.6G (9264168960 bytes)
disk size: 8.6G

Optional: Verify ISO image

wget [URL ISO/CHECKSUM]
wget [URL ISO/CHECKSUM.asc]
gpg RPM-GPG-KEY-CentOS-Official
gpg –verify CHECKSUM.asc

Sample Output:
root@ubuntuserver1:/var/lib/libvirt/boot# wget http://download.nus.edu.sg/mirror/centos/8.3.2011/isos/x86_64/CHECKSUM
–2021-02-15 15:36:13– http://download.nus.edu.sg/mirror/centos/8.3.2011/isos/x86_64/CHECKSUM
Resolving download.nus.edu.sg (download.nus.edu.sg)… 137.132.155.197
Connecting to download.nus.edu.sg (download.nus.edu.sg)|137.132.155.197|:80… connected.
HTTP request sent, awaiting response… 200 OK
Length: 319 [application/octet-stream]
Saving to: CHECKSUM
CHECKSUM 100%[==============================================>] 319 –.-KB/s in 0.001s 2021-02-15 15:36:13 (282 KB/s) – CHECKSUM saved [319/319]

root@ubuntuserver1:/var/lib/libvirt/boot# wget http://download.nus.edu.sg/mirror/centos/8.3.2011/isos/x86_64/CHECKSUM.asc
–2021-02-15 15:33:34– http://download.nus.edu.sg/mirror/centos/8.3.2011/isos/x86_64/CHECKSUM.asc
Resolving download.nus.edu.sg (download.nus.edu.sg)… 137.132.155.197
Connecting to download.nus.edu.sg (download.nus.edu.sg)|137.132.155.197|:80… connected.
HTTP request sent, awaiting response… 200 OK
Length: 1179 (1.2K) [application/octet-stream]
Saving to: CHECKSUM.asc
CHECKSUM.asc 100%[==============================================>] 1.15K –.-KB/s in
0.02s

root@ubuntuserver1:/var/lib/libvirt/boot# gpg RPM-GPG-KEY-CentOS-Official
gpg: directory `/root/.gnupg’ created
gpg: new configuration file `/root/.gnupg/gpg.conf’ created
gpg: WARNING: options in `/root/.gnupg/gpg.conf’ are not yet active during this run
gpg: keyring `/root/.gnupg/secring.gpg’ created
gpg: keyring `/root/.gnupg/pubring.gpg’ created

root@ubuntuserver1:/var/lib/libvirt/boot# gpg –verify CHECKSUM.asc
gpg: Signature made Fri 04 Dec 2020 11:48:55 PM +08 using RSA key ID 8483C65D


3.  Install using virt-install

virt-install [OPTION]…

Sample Output:

root@ubuntuserver1:# virt-install –virt-type=kvm –name centos8 –ram 8192 –vcpus=4 –os-type=Linux –cdrom=/var/lib/libvirt/boot/CentOS-8.3.2011-x86_64-dvd1.iso –network=bridge=br0,model=virtio –graphics vnc –disk path=/home/tux/images/centos8.qcow2,size=50,bus=virtio
WARNING Graphics requested but DISPLAY is not set. Not running virt-viewer.
WARNING No console to launch for the guest, defaulting to –wait -1

Starting install…
Allocating ‘centos8.qcow2’ | 50 GB 00:00:02
Creating domain… | 0 B 00:00:02
Domain installation still in progress. Waiting for installation to complete.

where:
name = VM/guest name
ram = 8Gb
cdrom = location of the ISO
network = br0 is the interface name
disk path = where to save the images

4. Continue installation via vnc

Step1. Find the vnc port number using this command:

virsh dumpxml [guestname] | grep vnc

Sample Output:
root@ubuntuserver1:/var/lib/libvirt/boot# virsh dumpxml centos8 | grep vnc
<graphics type=’vnc’ port=’5902′ autoport=’yes’ listen=’127.0.0.1′>

Step 2. SSH to setup the the tunnel

ssh username@hostname_or_IP -L [portnum]:[listenIP]:[portnum]

Sample Output:

ssh tux@192.168.15.19 -L 5902:127.0.0.1:5902
tux@192.168.15.19’s password:
Welcome to Ubuntu 16.04.6 LTS (GNU/Linux 4.4.0-169-generic x86_64)

* Documentation: https://help.ubuntu.com
* Management: https://landscape.canonical.com
* Support: https://ubuntu.com/advantage

System information as of Mon Feb 15 12:51:07 +08 2021

Last login: Mon Feb 15 11:53:15 2021 from 192.168.11.10
tux@ubuntuserver1:~$

Step3. Once connected, open your favorite VNC viewer and put the following, e.g. UltraVNC 127.0.0.1:5902
Host: 127.0.0.1 or localhost
Port: 5902

Sample:

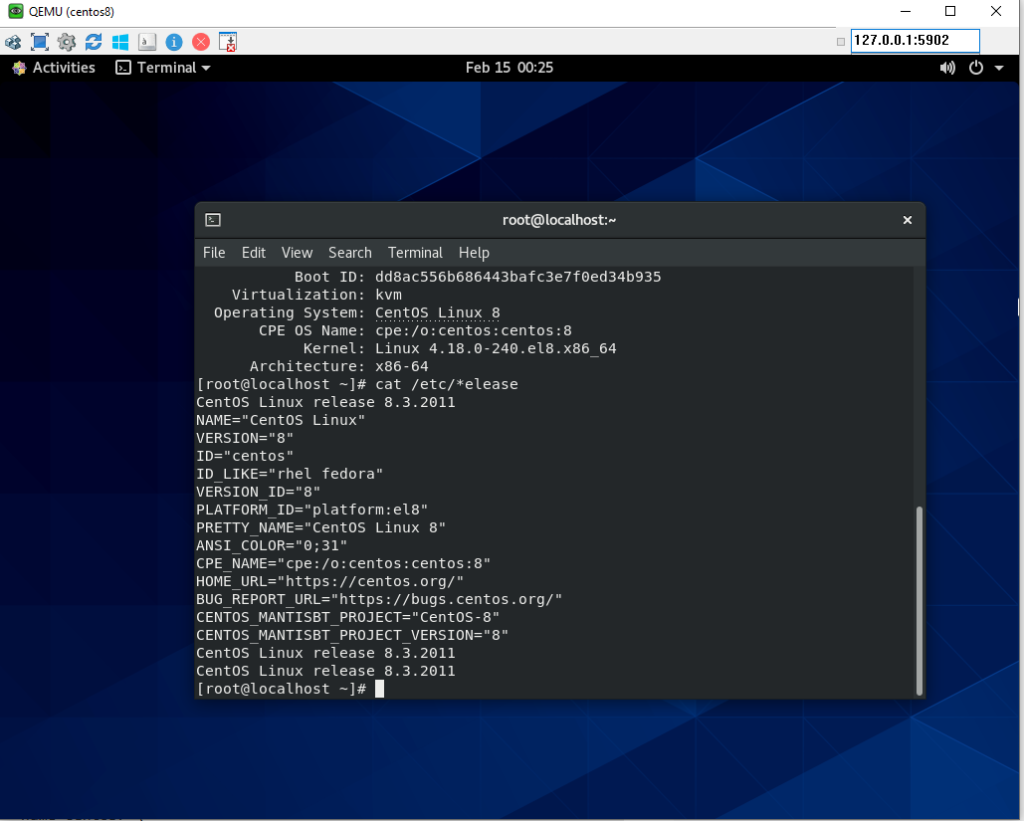
Once VNC is connected, you will see installation is starting
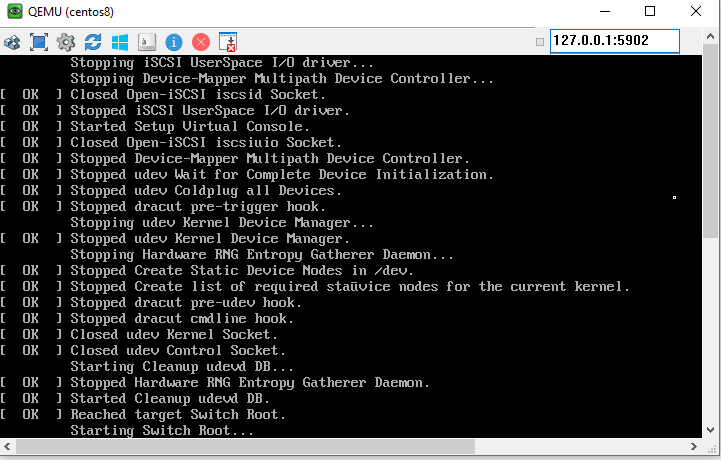
Welcome to Centos Linux 8 will appear, and can proceed installation.
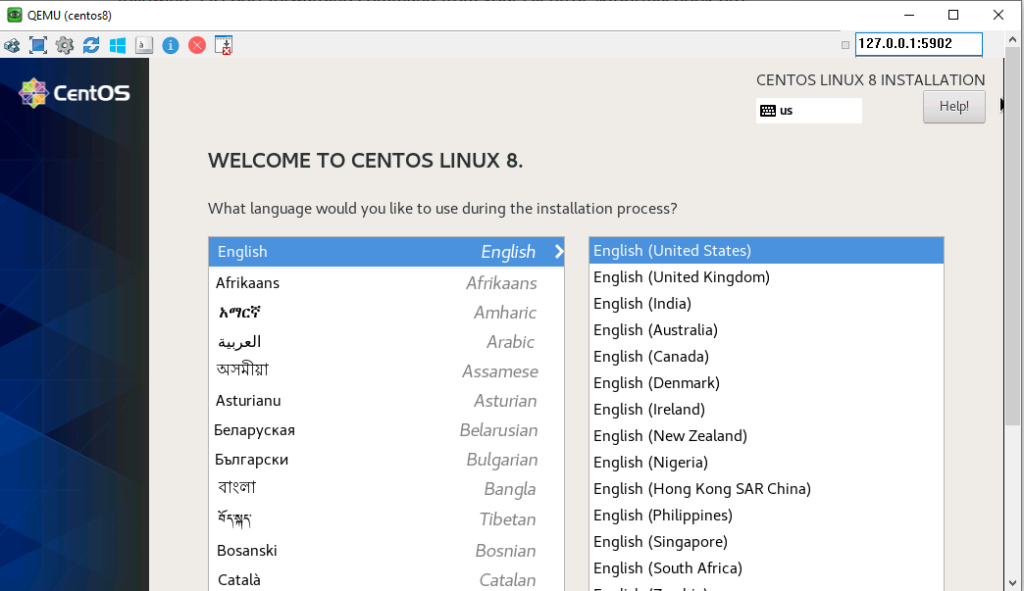
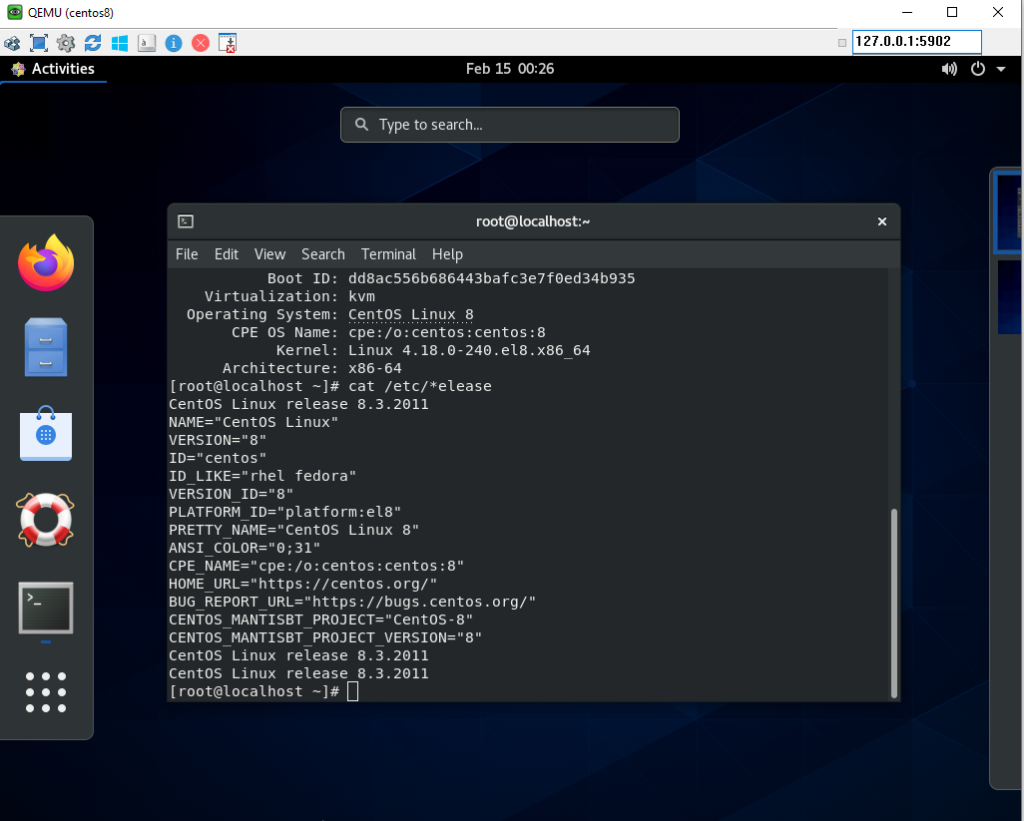
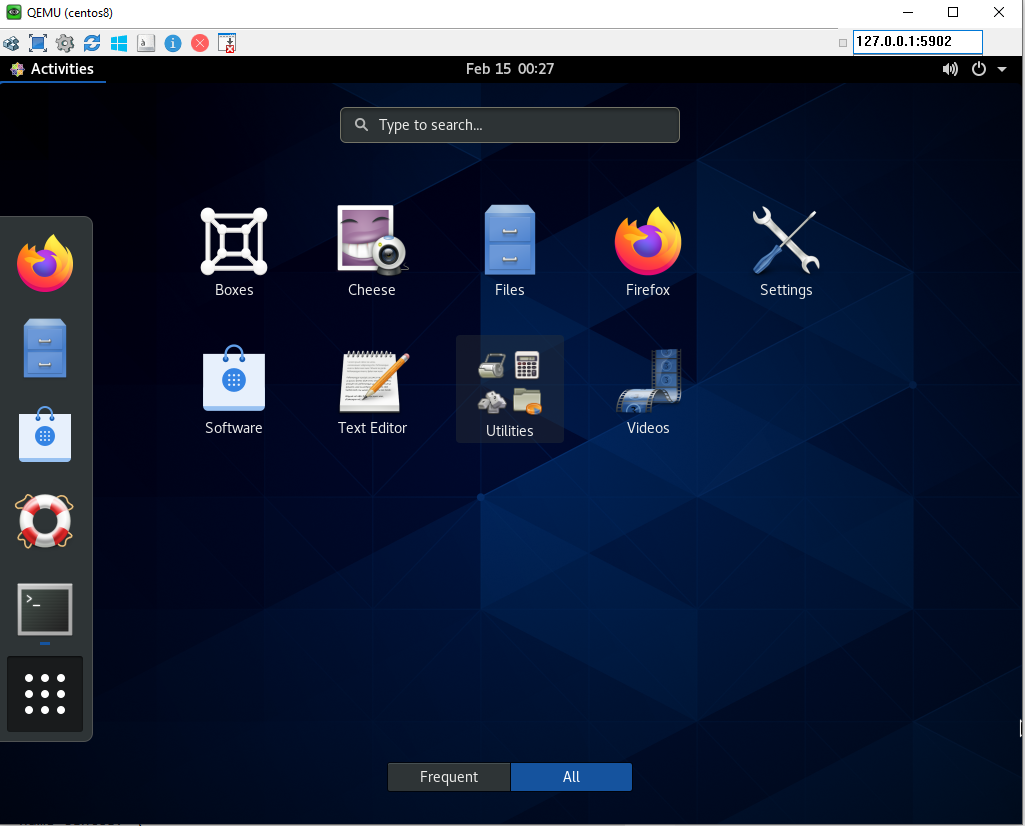
More screencaps during installation:
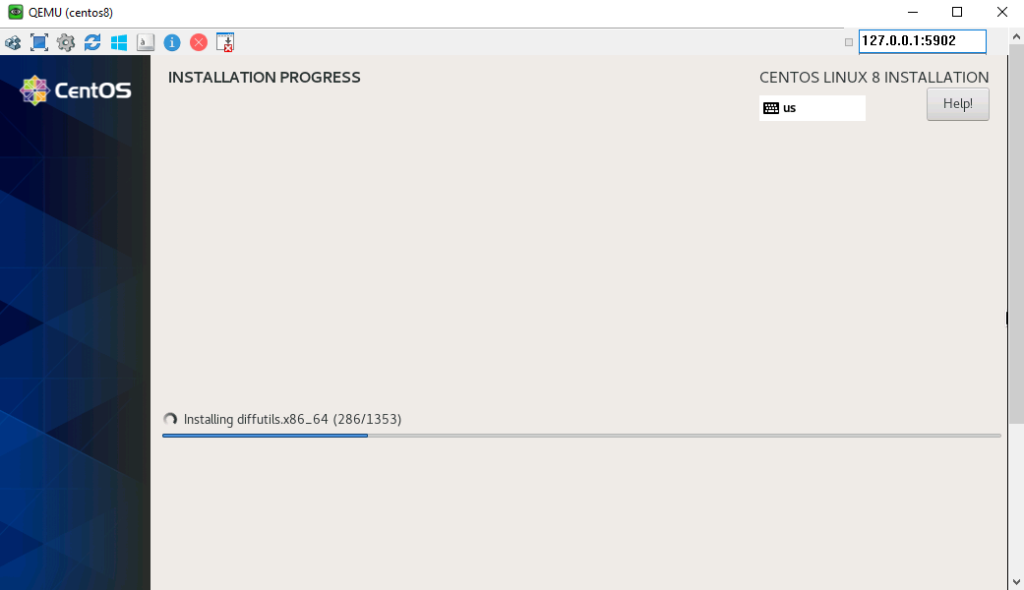
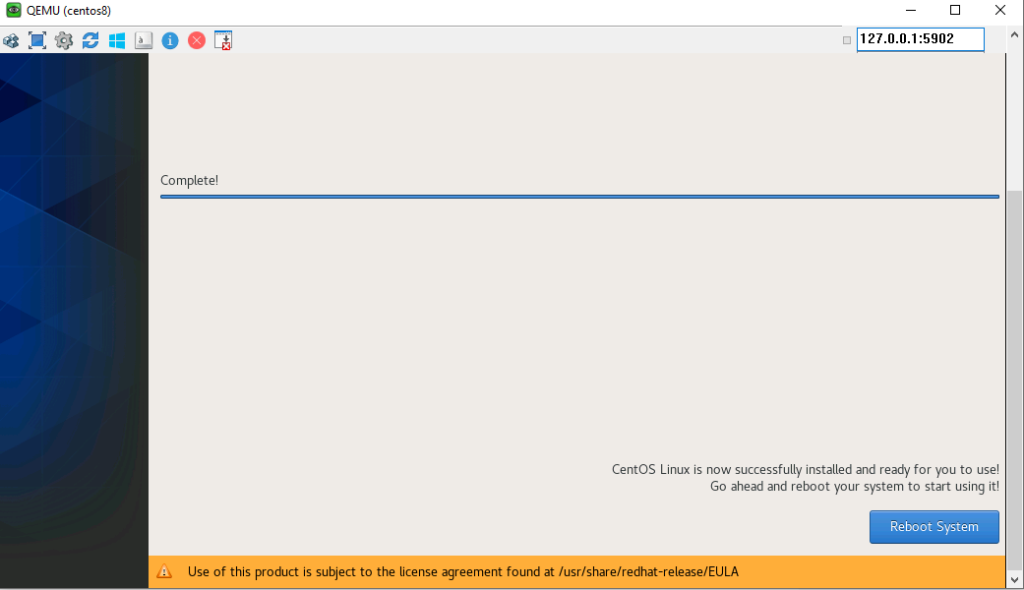
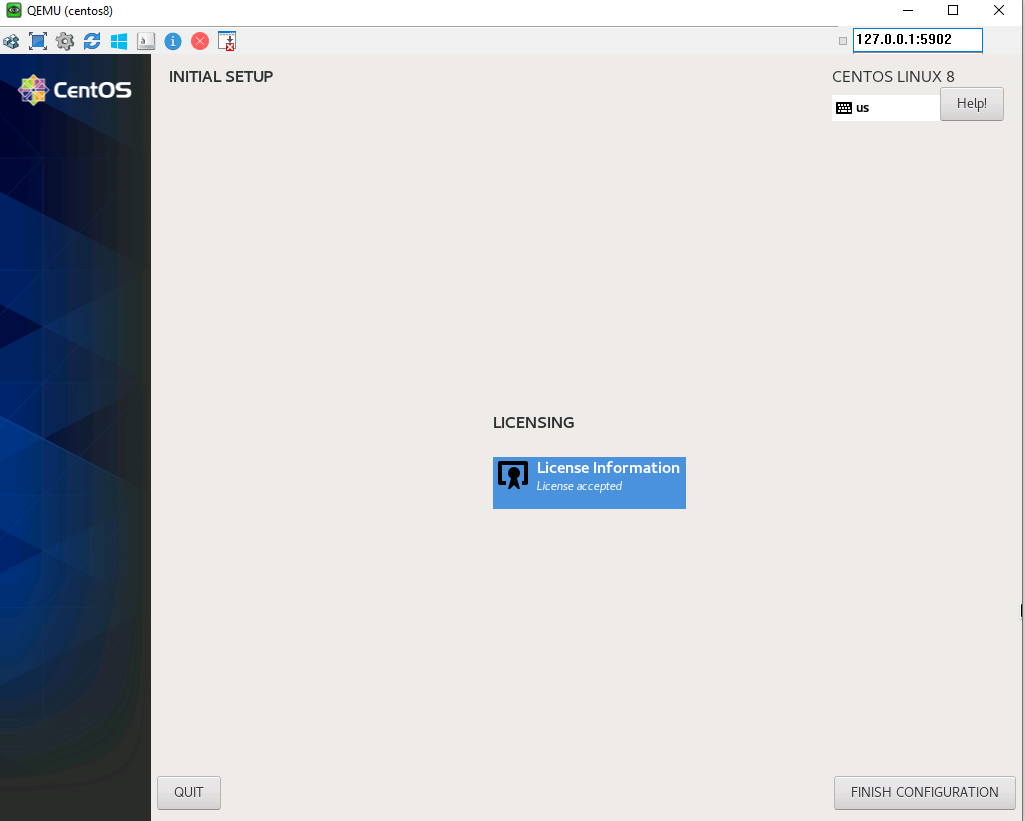
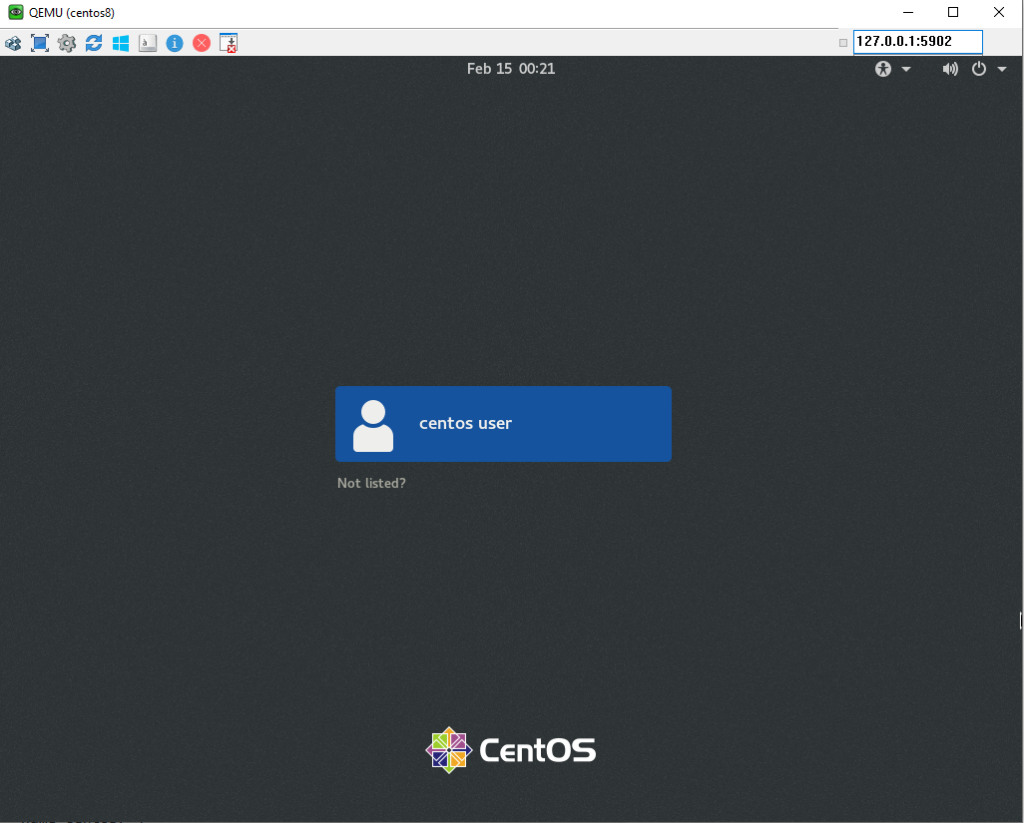
Installation is completed.

root@ubuntuserver1:/# virsh list
Id Name State
—————————————————-
5 eve-ng running
8 centos8 running


Configuring Centos 8 interface IP address and DNS so can go out to internet and be able to remotely access

1. Check the interface name

ifconfig

Sample Output:
[centosuser@localhost ~]$ ifconfig
ens3: flags=4163<UP,BROADCAST,RUNNING,MULTICAST> mtu 1500
ether 11:22:33:df:cf:03 txqueuelen 1000 (Ethernet)

2. Configure the interface

vi /etc/sysconfig/network-scripts/ifcfg-ens3

Sample Output:
[centosuser@localhost ~]$ vi /etc/sysconfig/network-scripts/ifcfg-ens3

You will see something this as default:
TYPE=Ethernet
PROXY_METHOD=none
BROWSER_ONLY=no
BOOTPROTO=dhcp
DEFROUTE=yes
IPV4_FAILURE_FATAL=no
IPV6INIT=yes
IPV6_AUTOCONF=yes
IPV6_DEFROUTE=yes
IPV6_FAILURE_FATAL=no
IPV6_ADDR_GEN_MODE=stable-privacy
NAME=ens3
UUID=15515422-cf38-4768-80c3-a066dee4f3
DEVICE=ens3
ONBOOT=yes

Add/Change the following:
BOOTPROTO=none
ONBOOT=yes
IPADDR=192.168.15.22
PREFIX=29
GATEWAY=192.168.15.17

Save and quit (:wq!)

Verify:
[centosuser@localhost ~]$ ping 192.168.15.17 -c 2
PING 192.168.15.17(192.168.15.17) 56(84) bytes of data.
64 bytes from 192.168.15.17: icmp_seq=1 ttl=255 time=0.858 ms
64 bytes from 192.168.15.17: icmp_seq=2 ttl=255 time=0.853 ms

— 192.168.15.17 ping statistics —
2 packets transmitted, 2 received, 0% packet loss, time 2ms
rtt min/avg/max/mdev = 0.884/0.892/0.901/0.031 ms

3. Bring up the interface

ifup  [interfacename]


Sample Output:
[centosuser@localhost ~]# ifup ens3
Connection successfully activated (D-Bus active path: /org/freedesktop/NetworkManager/ActiveConnection/3)

3. Configure the DNS

vi /etc/resolv.conf

Add the following:

nameserver [DNS IP]

Sample Output:
[centosuser@localhost ~]$ cat /etc/resolv.conf
nameserver 1.1.1.1
nameserver 8.8.8.8

Verify:
[centosuser@localhost ~]$ ping google.com -c 2
PING google.com (74.125.200.102) 56(84) bytes of data.
64 bytes from sa-in-f102.1e100.net (74.125.200.102): icmp_seq=1 ttl=107 time=2.17 ms
64 bytes from sa-in-f102.1e100.net (74.125.200.102): icmp_seq=2 ttl=107 time=2.24 ms

— google.com ping statistics —
2 packets transmitted, 2 received, 0% packet loss, time 3ms
rtt min/avg/max/mdev = 2.173/2.204/2.236/0.056 ms

The post Installation of CentOS 8 on Ubuntu Server KVM appeared first on Free Linux Tutorials.

Securing SSH using Firewalld on RHEL8 or CentOS8 Replacing TCP_Wrappers

$
0
0

As per Redhat official document titled “”Replacing TCP Wrappers in RHEL 8”  (https://access.redhat.com/solutions/3906701 ), it says:
The TCP Wrappers package has been deprecated in RHEL 7 and therefore it will not be available in RHEL 8 or later RHEL releases.

You won’t be able to see this “/etc/hosts.allow” and  “/etc/hosts.deny” files in your RedHat 8 or CentOS 8 environment even creating it won’t have any effect.

If your remember, this is sample how to allow SSH only coming from these sources (e.g. 192.168.20.100/32, 192.168.20.101/32 and 192.168.15.16/29) and deny all

Sample Config: (/etc/hosts.allow)

[root@freelinuxserver ~]# cat /etc/hosts.allow
#
# hosts.allow This file contains access rules which are used to
# allow or deny connections to network services that
# either use the tcp_wrappers library or that have been
# started through a tcp_wrappers-enabled xinetd.
#
# See ‘man 5 hosts_options’ and ‘man 5 hosts_access’
# for information on rule syntax.
# See ‘man tcpd’ for information on tcp_wrappers
#
sshd: 192.168.20.100 192.168.20.101 
sshd: 192.168.15.16/29

Sample Config: (/etc/hosts.deny)
[root@freelinuxserver ~]# cat /etc/hosts.deny
#
# hosts.deny This file contains access rules which are used to
# deny connections to network services that either use
# the tcp_wrappers library or that have been
# started through a tcp_wrappers-enabled xinetd.
#
# The rules in this file can also be set up in
# /etc/hosts.allow with a ‘deny’ option instead.
#
# See ‘man 5 hosts_options’ and ‘man 5 hosts_access’
# for information on rule syntax.
# See ‘man tcpd’ for information on tcp_wrappers
#
sshd: ALL except localhost

Solution: There are few ways to manage incoming traffic based on source, and one way of doing this is using firewalld particularly using zones.

  1. Verify if “firewalld” package is installed, if not install it.

yum list installed firewalld

Sample Output:
[root@freelinuxserver~]# yum list installed firewalld
Installed Packages
firewalld.noarch 0.8.2-2.el8 @anaconda

1. 1 If not install the package:

Install firewalld:

yum install -y firewalld

Enable the firewall for starting at boot:

systemctl enable firewalld

Restart the service

systemctl restart firewalld


2.  Use the following commands to verify the default config and zones.

  • List the default zone

firewall-cmd –get-default-zone

Sample Output:
[root@freelinuxserver ~]# firewall-cmd –get-default-zone
public

  • List information for all zones

firewall-cmd –list-all-zones

Sample output: (same omitted, highlighted the “public” zone). Notice the services allowed in ssh and sources is blank, meaning accepting all.[root@freelinuxserver~]# firewall-cmd –list-all-zones

public (active)
target: default
icmp-block-inversion: no
interfaces: enp2s0
sources:
services: dhcpv6-client ssh
ports:
protocols:
masquerade: no
forward-ports:
source-ports:
icmp-blocks:
rich rules:

  • List allowed  services:

firewall-cmd –zone=work –list-services

Sample output:
[root@freelinuxserver ~]# firewall-cmd –zone=work –list-services
dhcpv6-client ssh

3.  Remove the SSH service from the default zone ( public). Use the –permanent option to make it persistent even during reboot

firewall-cmd –permanent –remove-service=ssh

Sample Output:
[root@freelinuxserver ~]#firewall-cmd –permanent –remove-service=ssh
success

Verify using “firewall-cmd –list-all-zones” command

Sample Output: (Notice under services that the ssh removed)
[root@freelinuxserver~]# firewall-cmd –list-all-zones

public (active)
target: default
icmp-block-inversion: no
interfaces: ens3
sources:
services: dhcpv6-client
ports:
protocols:
masquerade: no
forward-ports:
source-ports:
icmp-blocks:
rich rules:


4. Create the zone, allow the SSH service and the source IPs.

firewall-cmd –permanent –new-zone=SSHZONE
firewall-cmd –permanent –zone=SSHZONE –add-source=[I.P.]
firewall-cmd –permanent –zone=SSHZONE –add-service=ssh

Sample output:
[root@freelinuxserver ~]# firewall-cmd –permanent –new-zone=SSHZONE
success
[root@freelinuxserver ~]# firewall-cmd –permanent –zone=SSHZONE –add-source=192.168.20.100/32
success
[root@freelinuxserver ~]# firewall-cmd –permanent –zone=SSHZONE –add-source=192.168.20.101/32
success
[root@freelinuxserver ~]# firewall-cmd –permanent –zone=SSHZONE –add-source=192.168.15.16/29
success
[root@freelinuxserver ~]# firewall-cmd –permanent –zone=SSHZONE –add-service=ssh

5. Reload the firewall to take effect and make the zone active.

firewall-cmd –reload

Sample Output:
[root@freelinuxserver~]# firewall-cmd –reload
success

6.  Verify using “firewall-cmd –list-all-zones” command

[root@freelinuxserver~]# firewall-cmd –list-all-zones
SSHZONE (active)
target: default
icmp-block-inversion: no
interfaces:
sources: 192.168.20.100/32 192.168.20.101/32 192.168.15.16/29
services: ssh
ports:
protocols:
masquerade: no
forward-ports:
source-ports:
icmp-blocks:
rich rules:

7. Test the rule. SSH from the allowed and not allowed IPs.

Optional: You can use this command also to see if the firewall is running

systemctl status firewalld.service

The post Securing SSH using Firewalld on RHEL8 or CentOS8 Replacing TCP_Wrappers appeared first on Free Linux Tutorials.
Top 5 Commands to Find IP address in Linux

$
0
0

These are the commands that can be used to find the private or public IP address in your interface(s).

If your IP is NAT’ed and want to find the public IP, refer to this tutorial –> Quick Tip: Get or Find your Public IP Address using curl

  1. ip a

Sample Output: (You can use “ip addr or “ip a”)

[root@localhost ~]# ip addr
lo: <LOOPBACK,UP,LOWER_UP> mtu 65536 qdisc noqueue state UNKNOWN group default qlen 1000
link/loopback 00:00:00:00:00:00 brd 00:00:00:00:00:00
inet 127.0.0.1/8 scope host lo
valid_lft forever preferred_lft forever
inet6 ::1/128 scope host
valid_lft forever preferred_lft forever

ens3: <BROADCAST,MULTICAST,UP,LOWER_UP> mtu 1500 qdisc fq_codel state UP group default qlen 1000
link/ether 52:54:00:df:cf:03 brd ff:ff:ff:ff:ff:ff
inet 192.168.15.22/29 brd 192.168.15.23 scope global noprefixroute ens3
valid_lft forever preferred_lft forever
inet6 fe80::704f:b774:7ae7:53cc/64 scope link noprefixroute
valid_lft forever preferred_lft forever

2. ifconfig

Sample Output: (ifconfig has been officially deprecated, but still can be use and still a favorite for old school server admins)

[root@localhost ~]# ifconfig
ens3: flags=4163<UP,BROADCAST,RUNNING,MULTICAST> mtu 1500
inet 192.168.15.22 netmask 255.255.255.248 broadcast 192.168.15.23
inet6 fe80::704f:b774:7ae7:53cc prefixlen 64 scopeid 0x20<link>
ether 52:54:00:df:cf:03 txqueuelen 1000 (Ethernet)
RX packets 316882 bytes 428387985 (408.5 MiB)
RX errors 0 dropped 0 overruns 0 frame 0
TX packets 140212 bytes 17341534 (16.5 MiB)
TX errors 0 dropped 0 overruns 0 carrier 0 collisions 0

 3.  hostname -I

where:
I = Display all network addresses of the host. This option enumerates all configured addresses on all network interfaces. The loopback interface and IPv6 link-local addresses are omitted.

Sample Output:
[root@localhost ~]# hostname -I
192.168.15.22

4. nmcli

Sample Output:

[root@localhost ~]# nmcli
ens3: connected to ens3
“Red Hat Virtio”
ethernet (virtio_net), 52:54:00:DF:CF:03, hw, mtu 1500
ip4 default
inet4 192.168.15.22/29
route4 192.168.15.16/29
route4 0.0.0.0/0
inet6 fe80::704f:b774:7ae7:53cc/64
route6 fe80::/64
route6 ff00::/8

You can use some options and combinations like
-p = Output is pretty. This causes nmcli to produce easily readable outputs for humans, i.e. values are aligned, headers are printed, etc.
“device show”  = to get complete information about known devices

nmcli -p device show

5.  ip route get [ADDRESS]

where:(ip route get command gets a single route to a destination)
ADDRESS = any valid IP address

Sample Output: ( If get e.g. 1, it will automatically means 1.0.0.0 IP address]

[root@localhost ~]# ip route get 1.1.1.1
1.1.1.1 via 192.168.15.17 dev ens3 src 192.168.15.22 uid 0
cache

Note: The 7th output will be the IP address. You can add “awk ‘{print $7}’ to print only the IP address, something like this

Sample Output:

[root@localhost ~]# ip route get 1.1.1.1 | awk ‘{print $7}’

192.168.15.22

The post Top 5 Commands to Find IP address in Linux appeared first on Free Linux Tutorials.
Top 5 Basic Steps to Troubleshoot Network in Linux

$
0
0

1.Find if your interface has IP address, it’s either obtained dynamically via DHCP server or manually configured using static configuration.

You can either use commands from the “iproute”  or “net-tools” package

ip addr
ifconfig

There are few more ways to find the IP address and you can refer to these following links below:
Top 5 Commands to Find IP address in Linux
Find your Public IP Address using curl

Sample Output:
[root@localhost ~]# ip addr
1: ens3: <BROADCAST,MULTICAST,UP,LOWER_UP> mtu 1500 qdisc fq_codel state UP group default qlen 1000
link/ether 52:54:00:df:cf:03 brd ff:ff:ff:ff:ff:ff
inet 192.168.15.22/29 brd 192.168.15.23 scope global noprefixroute ens3
valid_lft forever preferred_lft forever
inet6 fe80::704f:b774:7ae7:53cc/64 scope link noprefixroute
valid_lft forever preferred_lft forever


2. Find your gateway or default route by displaying the routing table.  There are few commands to do this:

netstat

– command to display network connections, routing tables, interface statistics, masquerade connections, and multicast memberships

netstat -nr –> where “n”  will show numerical addresses instead of trying to determine symbolic host, port or user names, while “-r” display the kernel routing tables. It is useful in determining your default route.

Sample Output:
[root@localhost ~]# netstat -nr
Kernel IP routing table
Destination Gateway Genmask Flags MSS Window irtt Iface
0.0.0.0  192.168.15.17 0.0.0.0 UG 0 0 0 ens3
192.168.15.16 0.0.0.0 255.255.255.248 U 0 0 0 ens3

route

-command to show or can even manipulate the IP routing table

route -n –> where “-n” is to show numerical addresses instead of trying to determine symbolic host names. This is useful if you are trying to determine why the route to your nameserver has vanished.

Sample output:
[root@localhost ~]# route -n
Kernel IP routing table
Destination Gateway Genmask Flags Metric Ref Use Iface
0.0.0.0 192.168.15.17 0.0.0.0 UG 100 0 0 ens3
192.168.15.16 0.0.0.0 255.255.255.248 U 100 0 0 ens3

ip route

-command for routing table management

ip route list  or ip route show  –> to display the routing table

Sample Output:
[root@localhost ~]# ip route list
default via 192.168.15.17 dev ens3 proto static metric 100
192.168.15.16/29 dev ens3 proto kernel scope link src 192.168.15.22 metric 100


3.  Test if a networked device is alive and reachable. It will send ICMP ECHO_REQUEST to network hosts. But not necessarily if host is unable to ping means the device is down, it could be also due to some firewall or ACL blocking ICMP ECHO requests.
Note: In troubleshooting network connectivity, if server’s interface is configured, first to try to ping its default route or gateway IP.

ping

Sample output: (Ctrl +C to stop (^C))
[root@localhost ~]# ping 192.168.15.17
PING 192.168.15.17 (192.168.15.17) 56(84) bytes of data.
64 bytes from 192.168.15.17: icmp_seq=1 ttl=255 time=0.913 ms
64 bytes from 192.168.15.17: icmp_seq=2 ttl=255 time=0.816 ms

Popular options with “ping” command.

ping -c [count]–> Stop after sending count ECHO_REQUEST packets.

Sample Output:
[root@localhost ~]# ping -c 3 google.com

PING google.com (172.217.194.138) 56(84) bytes of data.
64 bytes from 172.217.194.138 (172.217.194.138): icmp_seq=1 ttl=108 time=2.43 ms
64 bytes from 172.217.194.138 (172.217.194.138): icmp_seq=2 ttl=108 time=4.85 ms
64 bytes from 172.217.194.138 (172.217.194.138): icmp_seq=3 ttl=108 time=2.36 ms
— google.com ping statistics —
3 packets transmitted, 3 received, 0% packet loss, time 4ms
rtt min/avg/max/mdev = 2.356/3.212/4.854/1.162 ms

ping -s [packetsize] –> Specifies the number of data bytes to be sent. The default is 56, which translates into 64 ICMP data bytes when combined with the 8 bytes of ICMP header data.


4.  Find the path taken by a packet from  your device to destination using “these commands below. . It will display the route packets trace to network host. This is useful in determining which route or hop it stopped for further troubleshooting.

traceroute

Install traceroute if still not existing. Some distribution will ask you to install when found command not found,e.g. CentOS 8

Sample Output:
[root@localhost ~]# traceroute google.com
bash: traceroute: command not found…
Install package ‘traceroute’ to provide command ‘traceroute’? [N/y] y
* Waiting in queue…
The following packages have to be installed:
traceroute-3:2.1.0-6.el8.x86_64 Traces the route taken by packets over an IPv4/IPv6 network
Proceed with changes? [N/y] y
* Waiting in queue…
* Waiting for authentication…
* Waiting in queue…
* Downloading packages…
* Requesting data…
* Testing changes…
* Installing packages…
traceroute to google.com (172.217.194.102), 30 hops max, 60 byte packets
1 17.15.168.192.freelinuxtutorials.com (192.168.15.17) 0.906 ms 0.801 ms 0.697 ms
2 192.168.2.21 (192.168.2.21) 0.907 ms 0.757 ms 0.720 ms
3 172.217.194.102 (172.217.194.102) 1.836 ms 1.887 ms 1.986 ms
[root@localhost ~]#

Another way to traces path to a network host is:

tracepath

-command traces path to destination discovering MTU along this path. It uses UDP port port or some random port. It is similar to traceroute, only does not require superuser privileges and has no fancy options.

Sample Output:
[root@localhost ~]# tracepath google.com
1?: [LOCALHOST] pmtu 1500
1: 17.15.168.192.freelinuxtutorials.com 1.020ms
1: 17.15.168.192.freelinuxtutorials.com 1.215ms
2: 192.168.2.21 1.076ms
3: 172.217.194.102 1.318ms reached
Resume: pmtu 1500 hops 3 back 3


5. Check if can query domain name servers. If you happen to ping private and public IP addresses but cannot resolve hostnames, then something related with your DNS (domain name server) configuration. Use “nslookup” to query DNS.

nslookup

e.g.
google.com = 74.125.24.102

If you can ping 74.125.24.102, but cannot ping google.com, then you can use “nslookup” to query further

[root@localhost ~]# ping -c 2 74.125.24.102
PING 74.125.24.102 (74.125.24.102) 56(84) bytes of data.
64 bytes from 74.125.24.102: icmp_seq=1 ttl=107 time=1.89 ms
64 bytes from 74.125.24.102: icmp_seq=2 ttl=107 time=1.82 ms

— 74.125.24.102 ping statistics —
2 packets transmitted, 2 received, 0% packet loss, time 2ms
rtt min/avg/max/mdev = 1.823/1.858/1.893/0.035 ms

[root@localhost ~]# ping google.com
ping: google.com: Name or service not known

[root@localhost ~]# nslookup google.com
;; connection timed out; no servers could be reached

If received connection timed out, it means it cannot reach the DNS servers. One way to fix this is by adding your preferred DNS in your /etc/resolv.conf file. We can use free public DNS like from Cloudflare (1.1.1.1) or Google (8.8.8.8)

vi /etc/resolv.conf

Sample Output:
[root@localhost ~]# cat /etc/resolv.conf
nameserver 1.1.1.1
nameserver 8.8.8.8

Try again:

[root@localhost ~]# nslookup google.com
Server: 1.1.1.1
Address: 1.1.1.1#53

Non-authoritative answer:
Name: google.com
Address: 74.125.24.102
Name: google.com
Address: 2404:6800:4003:c04::66

Most server administrators preferred another flexible tool for interrogating and troubleshooting DNS problems because its flexibility, ease of use and clarity of output.

dig

Sample Output:
[root@localhost ~]# dig google.com

; <<>> DiG 9.11.20-RedHat-9.11.20-5.el8 <<>> google.com
;; global options: +cmd
;; Got answer:
;; ->>HEADER<<- opcode: QUERY, status: NOERROR, id: 29806
;; flags: qr rd ra; QUERY: 1, ANSWER: 6, AUTHORITY: 0, ADDITIONAL: 1

;; OPT PSEUDOSECTION:
; EDNS: version: 0, flags:; udp: 1232
;; QUESTION SECTION:
;google.com. IN A

;; ANSWER SECTION:
google.com. 113 IN A 172.217.194.101
google.com. 113 IN A 172.217.194.102

;; Query time: 2 msec
;; SERVER: 1.1.1.1#53(1.1.1.1)
;; WHEN: Fri Feb 19 02:55:33 EST 2021
;; MSG SIZE rcvd: 135

Useful options of “dig” command:

dig -t [type] [domain/IP] –>  where “-t” is to query the resource record type (e.g. NS, AAAA, MX)

Sample Output:
[root@localhost ~]# dig -t AAAA google.com

; <<>> DiG 9.11.20-RedHat-9.11.20-5.el8 <<>> -t AAAA google.com
;; global options: +cmd
;; Got answer:
;; ->>HEADER<<- opcode: QUERY, status: NOERROR, id: 760
;; flags: qr rd ra; QUERY: 1, ANSWER: 4, AUTHORITY: 0, ADDITIONAL: 1

;; OPT PSEUDOSECTION:
; EDNS: version: 0, flags:; udp: 1232
;; QUESTION SECTION:
;google.com. IN AAAA

;; ANSWER SECTION:
google.com. 193 IN AAAA 2404:6800:4003:c03::65
google.com. 193 IN AAAA 2404:6800:4003:c03::8a
google.com. 193 IN AAAA 2404:6800:4003:c03::8b
google.com. 193 IN AAAA 2404:6800:4003:c03::71

;; Query time: 2 msec
;; SERVER: 1.1.1.1#53(1.1.1.1)
;; WHEN: Fri Feb 19 03:00:18 EST 2021
;; MSG SIZE rcvd: 151

Another DNS lookup utility that can be  used to convert names to IP addresses and vice versa

host

Sample Output:
[root@localhost ~]# host google.com
google.com has address 74.125.24.102
google.com has IPv6 address 2404:6800:4003:c03::66
google.com mail is handled by 10 aspmx.l.google.com.

Honorable Mention:

mtr

It is a network diagnostic tool combines the functionality of the traceroute and ping programs in a single network diagnostic tool.

As mtr starts, it investigates the network connection between the host mtr runs on and HOSTNAME by sending packets with purposely low TTLs. It continues to send packets with low TTL, noting the response time of the inter
vening routers. This allows mtr to print the response percentage and response times of the internet route to HOSTNAME. A sudden increase in packet loss or response time is often an indication of a bad (or simply overloaded) link.

The results are usually reported as round-trip-response times in milliseconds and the percentage of packetloss.

Sample Output:
[root@localhost ~]# mtr 1.1.1.1
My traceroute [v0.92]
localhost.localdomain (192.168.15.22) 2021-02-19T03:09:22-0500
Keys: Help Display mode Restart statistics Order of fields quit
Packets Pings
Host Loss% Snt Last Avg Best Wrst StDev
1. 17.15.168.192.freelinuxtutorials.com 0.0% 7 0.9 1.3 0.9 3.0 0.8
2. 192.16.2.21 0.0% 7 1.0 0.9 0.9 1.0 0.0
3. 172.20.0.10 0.0% 7 2.3 1.7 1.0 2.6 0.7
4. 162.158.160.230 20.0% 6 1.6 1.7 1.6 1.9 0.1
5. one.one.one.one 0.0% 6 1.9 1.9 1.7 2.0 0.1

The post Top 5 Basic Steps to Troubleshoot Network in Linux appeared first on Free Linux Tutorials.

How to Install and Configure Cacti Network Monitoring on Ubuntu

$
0
0

Cacti is an open-source, web-based network monitoring and RRDTool-based Graphing Solution. Compared to MRTG, Cacti stores information in a MySQL database to create graphs and populate  data. It was designed to monitor and collect data about network or system devices.

Tested Platform (it should work with other older or later versions as well, recommended to use the source file instead of doing it via “apt install”.
-Ubuntu 16.04.7 LTS (GNU/Linux 4.4.0-169-generic x86_64)
– Cacti Server v1.2.16 (latest as at the time of writing)
-PHP 7.0
-Apache/2.4.18
-MySQL (10.0.38 MariaDB)
-Cisco UCS (Hardware)

Steps on Cacti Installation and Configuration on Ubuntu Server:

1. Update Server and default packages

sudo apt update && sudo apt upgrade

Sample Output:
tux@labucs1:~$ sudo apt update && sudo apt upgrade
[sudo] password for tux:
Get:1 http://security.ubuntu.com/ubuntu xenial-security InRelease [109 kB]
Hit:2 http://sg.archive.ubuntu.com/ubuntu xenial InRelease
Get:3 http://sg.archive.ubuntu.com/ubuntu xenial-updates InRelease [109 kB]
Hit:4 http://us.archive.ubuntu.com/ubuntu xenial InRelease
Reading package lists… Done

2. Install Apache Webserver (with PHP module)

sudo apt install apache2 libapache2-mod-php

Sample Output:
tux@labucs1:~$ sudo apt install apache2 libapache2-mod-php
The following additional packages will be installed:
libapache2-mod-php7.0 php-common php7.0-cli php7.0-common php7.0-json php7.0-opcache php7.0-readline
Suggested packages:
php-pear
The following packages will be REMOVED:
php5-cli php5-readline
The following NEW packages will be installed:
libapache2-mod-php libapache2-mod-php7.0 php-common php7.0-cli php7.0-common php7.0-json php7.0-opcache
php7.0-readline
0 upgraded, 8 newly installed, 2 to remove and 3 not upgraded.
Need to get 3,474 kB of archives.
After this operation, 4,591 kB of additional disk space will be used.
Do you want to continue? [Y/n]
Creating config file /etc/php/7.0/apache2/php.ini with new version
apache2_invoke: Enable module php7.0
Setting up libapache2-mod-php (1:7.0+35ubuntu6.1) …

3. Install MariaDB Database

sudo apt install mariadb-server mariadb-client

Sample Output:
tux@labucs1:~$ sudo apt install mariadb-server mariadb-client
The following packages will be REMOVED:
mysql-client mysql-client-5.7 mysql-client-core-5.7
The following NEW packages will be installed:
mariadb-client mariadb-client-10.0 mariadb-client-core-10.0 mariadb-common mariadb-server mariadb-server-10.0
mariadb-server-core-10.0
0 upgraded, 7 newly installed, 3 to remove and 3 not upgraded.
Need to get 14.5 MB of archives.
After this operation, 75.5 MB of additional disk space will be used.
Do you want to continue? [Y/n]
Processing triggers for ureadahead (0.100.0-19.1) …
Setting up mariadb-client-core-10.0 (10.0.38-0ubuntu0.16.04.1) …
Setting up mariadb-client-10.0 (10.0.38-0ubuntu0.16.04.1) …
Setting up mariadb-server-core-10.0 (10.0.38-0ubuntu0.16.04.1) …
Setting up mariadb-server-10.0 (10.0.38-0ubuntu0.16.04.1) …
Setting up mariadb-client (10.0.38-0ubuntu0.16.04.1) …
Setting up mariadb-server (10.0.38-0ubuntu0.16.04.1) …
Processing triggers for systemd (229-4ubuntu21.29) …
Processing triggers for ureadahead (0.100.0-19.1) …

4. Install PHP packages and extensions

sudo apt install php php-mysql php-snmp php-xml php-gd php-ldap php-curl php-mbstring php-common php-gmp

Sample Output:
tux@labucs1:~$ sudo apt install php php-mysql php-snmp php-xml php-gd php-ldap php-curl php-mbstring php-common php-gmp

The following additional packages will be installed:
php7.0 php7.0-curl php7.0-gd php7.0-gmp php7.0-ldap php7.0-mbstring php7.0-mysql php7.0-snmp php7.0-xml
The following NEW packages will be installed:
php php-curl php-gd php-gmp php-ldap php-mbstring php-mysql php-snmp php-xml php7.0 php7.0-curl php7.0-gd
php7.0-gmp php7.0-ldap php7.0-mbstring php7.0-mysql php7.0-snmp php7.0-xml
0 upgraded, 18 newly installed, 0 to remove and 3 not upgraded.
Need to get 838 kB of archives.
After this operation, 3,104 kB of additional disk space will be used.
Do you want to continue? [Y/n]
Creating config file /etc/php/7.0/mods-available/xsl.ini with new version
Setting up php-xml (1:7.0+35ubuntu6.1) …
Processing triggers for libapache2-mod-php7.0 (7.0.33-0ubuntu0.16.04.16) …

5. Install SNMP and RRDTool

sudo apt install snmp snmpd rrdtool librrds-perl snmp-mibs-downloader

Sample Output:
tux@labucs1:~$ sudo apt install snmp snmpd rrdtool librrds-perl snmp-mibs-downloader
The following additional packages will be installed:
libdbi1 librrd4 smistrip
Suggested packages:
snmptrapd
The following NEW packages will be installed:
libdbi1 librrd4 librrds-perl rrdtool smistrip snmp snmp-mibs-downloader snmpd
0 upgraded, 8 newly installed, 0 to remove and 3 not upgraded.
Need to get 5,923 kB of archives.
After this operation, 8,476 kB of additional disk space will be used.
Do you want to continue? [Y/n] y

6.  Tuning of  Database

a. Backup and Configure:

sudo cp /etc/mysql/mariadb.conf.d/50-server.cnf  /etc/mysql/mariadb.conf.d/50-server.cnf.ORIG

sudo vi /etc/mysql/mariadb.conf.d/50-server.cnf

Sample Output:
tux@labucs1:/etc/mysql/mariadb.conf.d$ sudo cp 50-server.cnf 50-server.cnf.ORIG
tux@labucs1:/etc/mysql/mariadb.conf.d$ sudo vi /etc/mysql/mariadb.conf.d/50-server.cnf

Before: (/etc/mysql/mariadb.conf.d/50-server.cnf)
# this is only for the mysqld standalone daemon
[mysqld]
#

After: (/etc/mysql/mariadb.conf.d/50-server.cnf) (Customize as per user requirements)
# this is only for the mysqld standalone daemon

[mysqld]
collation-server = utf8mb4_unicode_ci
max_heap_table_size = 128M
tmp_table_size = 128M
join_buffer_size = 64M
innodb_file_format = Barracuda
innodb_large_prefix = 1
innodb_buffer_pool_size = 512M
innodb_flush_log_at_timeout = 3
innodb_read_io_threads = 32
innodb_write_io_threads = 16
innodb_io_capacity = 5000
innodb_io_capacity_max = 10000
innodb_buffer_pool_instances = 21

Save and quit (:wq!)

b. Restart MariaDB

sudo systemctl restart mysql

Sample Output:
tux@labucs1:/$ sudo systemctl restart mysql
tux@labucs1:/$

7. Create Cacti database and grant permission to “cactiuser” with “password” as password. (Recommended to use strong password). After that , flush privileges.

sudo mysql -u root -p

tux@labucs1:/$ sudo mysql -u root -p
Enter password:
Welcome to the MariaDB monitor. Commands end with ; or \g.
Your MariaDB connection id is 32
Server version: 10.0.38-MariaDB-0ubuntu0.16.04.1 Ubuntu 16.04
Copyright (c) 2000, 2018, Oracle, MariaDB Corporation Ab and others.
Type ‘help;’ or ‘\h’ for help. Type ‘\c’ to clear the current input statement.

MariaDB [(none)]> create database cacti;
Query OK, 1 row affected (0.00 sec)

MariaDB [(none)]> GRANT ALL ON cacti.* TO cactiuser@localhost IDENTIFIED BY ‘password’;
Query OK, 0 rows affected (0.00 sec)

MariaDB [(none)]> flush privileges;
Query OK, 0 rows affected (0.00 sec)

MariaDB [(none)]> exit
Bye

Test the username and password on “cacti” database.

tux@labucs1:/$ mysql -u cactiuser -p cacti
Enter password:
Welcome to the MariaDB monitor. Commands end with ; or \g.
Your MariaDB connection id is 35
Server version: 10.0.38-MariaDB-0ubuntu0.16.04.1 Ubuntu 16.04
Copyright (c) 2000, 2018, Oracle, MariaDB Corporation Ab and others.
Type ‘help;’ or ‘\h’ for help. Type ‘\c’ to clear the current input statement.
MariaDB [cacti]>

8. Update Timezone

sudo vi /etc/php/7.0/apache2/php.ini

Sample Output:
tux@labucs1:/$ sudo vi /etc/php/7.0/apache2/php.ini

memory_limit = 512M
max_execution_time = 60
date.timezone = Asia/Singapore

Do the same thing for  /etc/php/7.0/cli/php.ini

sudo vi /etc/php/7.0/cli/php.ini

tux@labucs1:/$ sudo vi /etc/php/7.0/cli/php.ini

memory_limit = 512M
max_execution_time = 60
date.timezone = Asia/Singapore

Restart Apache service to take effect

sudo systemctl restart apache2

Sample Output:
tux@labucs1:/$ sudo systemctl restart apache2

9. Install Cacti (there are two ways , you can either download and extract the tarball file from the official website, or install using the apt install). I recommended doing Method 1.

Method 1:
a. Download the latest version using “wget” command

wget https://www.cacti.net/downloads/cacti-latest.tar.gz

Sample Output:
tux@labucs1:~$ wget https://www.cacti.net/downloads/cacti-latest.tar.gz
–2021-02-21 14:21:00– https://www.cacti.net/downloads/cacti-latest.tar.gz
Resolving www.cacti.net (www.cacti.net)… 172.67.196.107, 104.21.21.50, 2606:4700:3031::ac43:c46b, …
Connecting to www.cacti.net (www.cacti.net)|172.67.196.107|:443… connected.
HTTP request sent, awaiting response… 200 OK
Length: 29197220 (28M) [application/octet-stream]
Saving to: cacti-latest.tar.gz
cacti-latest.tar.gz 100%[==============================================>] 27.84M 961KB/s in 6m 33s
2021-02-21 14:27:38 (72.5 KB/s) – cacti-latest.tar.gz saved [29197220/29197220]

b. Move the file to your Apache Document Root e.g. (/var/www/html)

sudo cp cacti-latest.tar.gz /var/www/html/

c. Extract the file. Rename to Cacti folder
sudo cd /var/www/html
sudo tar -zxvf cacti-latest.tar.gz
sudo mv cacti-1* cacti

Method2: (Install using the “apt install”, I won’t discuss this further)

sudo apt install cacti

Sample Output:
tux@labucs1:/var/www/html$ sudo apt install cacti
The following additional packages will be installed:
dbconfig-common dbconfig-mysql javascript-common libjs-jquery libjs-jquery-cookie libjs-jquery-ui
libjs-jquery-ui-theme-ui-lightness libphp-adodb
Suggested packages:
moreutils libjs-jquery-ui-docs php-adodb
The following NEW packages will be installed:
cacti dbconfig-common dbconfig-mysql javascript-common libjs-jquery libjs-jquery-cookie libjs-jquery-ui
libjs-jquery-ui-theme-ui-lightness libphp-adodb
0 upgraded, 9 newly installed, 0 to remove and 3 not upgraded.
Need to get 3,379 kB of archives.
After this operation, 11.8 MB of additional disk space will be used.
Do you want to continue? [Y/n]

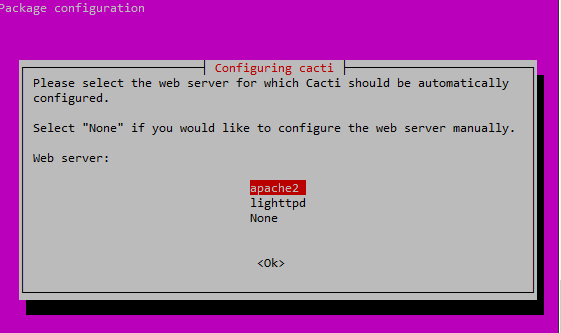
(You will be prompted with a menu-based installation like this, Choose Apache2)

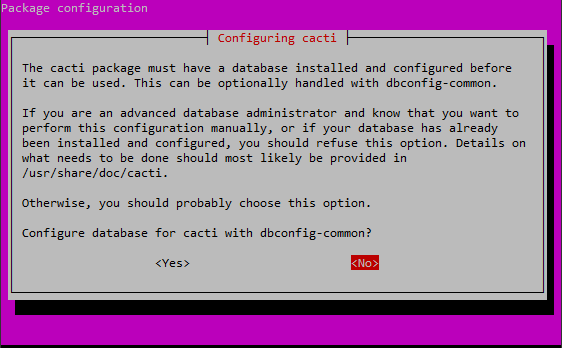
As we already created the “cacti” database earlier,  Select “No” for manual config.

Finish Installation (Sample Output below)
Setting up cacti (0.8.8f+ds1-4ubuntu4.16.04.2) …
dbconfig-common: writing config to /etc/dbconfig-common/cacti.conf
Creating config file /etc/dbconfig-common/cacti.conf with new version
Creating config file /etc/cacti/debian.php with new version
dbconfig-common: flushing administrative password
Creating config file /etc/apache2/conf-available/cacti.conf with new version
Creating config file /etc/lighttpd/conf-available/20-cacti.conf with new version apache2_invoke: Enable configuration cacti
tux@labucs1:~$

10. Configure SNMP

a. Comment out to enable loading of MIBs

sudo vi /etc/snmp/snmp.conf

tux@labucs1:~$ sudo vi /etc/snmp/snmp.conf
[sudo] password for tux:

From:
# As the snmp packages come without MIB files due to license reasons, loading
# of MIBs is disabled by default. If you added the MIBs you can reenable
# loading them by commenting out the following line.
mibs :

To:
# As the snmp packages come without MIB files due to license reasons, loading
# of MIBs is disabled by default. If you added the MIBs you can reenable
# loading them by commenting out the following line.
#mibs :

b. Configure SNMP community.  Disable the public community and configure your own Read-only SNMP community

sudo vi /etc/snmp/snmpd.conf

Sample Output:
tux@labucs1:~$ sudo vi /etc/snmp/snmpd.conf

From:
# Default access to basic system info
rocommunity public default -V systemonly
# rocommunity6 is for IPv6
rocommunity6 public default -V systemonly

To:
# Default access to basic system info
# rocommunity public default -V systemonly
# rocommunity6 is for IPv6
# rocommunity6 public default -V systemonly

rocommunity Fr33L1nuXTut0r14L5 localhost

c.  Restart SNMP service for changes to take effect

sudo systemctl restart snmpd

Sample Output:
tux@labucs1:~$ sudo systemctl restart snmpd
tux@labucs1:~$

Verify if SNMP is working:

sudo snmpwalk -v2c -c “your SNMP community” localhost system

Sample Output:
tux@labucs1:~$ sudo snmpwalk -v2c -c Fr33L1nuXTut0r14L5 localhost system
SNMPv2-MIB::sysDescr.0 = STRING: Linux labucs1 4.4.0-169-generic #198-Ubuntu SMP Tue Nov 12 10:38:00 UTC 2019 x86_64
SNMPv2-MIB::sysObjectID.0 = OID: NET-SNMP-MIB::netSnmpAgentOIDs.10
DISMAN-EVENT-MIB::sysUpTimeInstance = Timeticks: (8607) 0:01:26.07
SNMPv2-MIB::sysContact.0 = STRING: Me <me@example.org>
SNMPv2-MIB::sysName.0 = STRING: labucs1

11. Configure the Cacti Server

a. Import mysql database schema

sudo mysql -u root -p cacti < /var/www/html/cacti/cacti.sql

b. Backup config file

sudo cp /var/www/html/cacti/include/config.php /var/www/html/cacti/include/config.php.ORIG

c. Edit Cacti config file for MySQL database information

sudo vi /var/www/html/cacti/include/config.php

Sample Output:
* Make sure these values reflect your actual database/host/user/password
*/
$database_type = ‘mysql’;
$database_default = ‘cacti‘;
$database_hostname = ‘localhost‘;
$database_username = ‘cactiuser‘;
$database_password = ‘password‘;
$database_port = ‘3306’;
$database_retries = 5;
$database_ssl = false;
$database_ssl_key = ”;
$database_ssl_cert = ”;
$database_ssl_ca = ”;

d. Change directory ownership and permission

sudo chown -R www-data:www-data /var/www/html/cacti/

sudo chmod -R 775 /var/www/html/cacti/

e. Modify crontab to poll every 5 minutes

sudo vi /etc/cron.d/cacti

Add the following (save and quit)
*/5 * * * * www-data php /var/www/html/cacti/poller.php > /dev/null 2>&1

f.  Configure the cacti.conf for Apache, and use the following configuration

sudo vi /etc/apache2/sites-available/cacti.conf

To add in /etc/apache2/sites-available/cacti.conf (save and quit)
Note: (You can add something like
“Require ip 192.168.15.16/29” instead of “Require all granted”
or “Allow from 192.168.15.21” instead of “Allow from all”
to only allow specific IP or IP ranges.

Alias /cacti /var/www/html/cacti

<Directory /var/www/html/cacti>
Options +FollowSymLinks
AllowOverride None
<IfVersion >= 2.3>
Require all granted
</IfVersion>
<IfVersion < 2.3>
Order Allow,Deny
Allow from all
</IfVersion>

AddType application/x-httpd-php .php

<IfModule mod_php.c>
php_flag magic_quotes_gpc Off
php_flag short_open_tag On
php_flag register_globals Off
php_flag register_argc_argv On
php_flag track_vars On
# this setting is necessary for some locales
php_value mbstring.func_overload 0
php_value include_path .
</IfModule>

DirectoryIndex index.php
</Directory>

g. Enable the Virtual Host created using this command

sudo a2ensite cacti

h .Restart Apache service for changes to take effect

sudo systemctl restart apache2

Additional Note: You can inspect the logs for troubleshooting using this command.
sudo tail -f /var/log/apache2/error.log

i. Create log file and change ownership to “www-data”

sudo touch /var/www/html/cacti/log/cacti.log

sudo chown -R www-data:www-data /var/www/html/cacti/log/cacti.log

(Sample output of cacti.log)
tux@labucs1:~$ tail /var/www/html/cacti/log/cacti.log
2021-02-22 11:55:02 – SYSTEM STATS: Time:1.2776 Method:cmd.php Processes:1 Threads:1 Hosts:1 HostsPerProcess:1 DataSources:5 RRDsProcessed:5
2021-02-22 12:00:02 – SYSTEM STATS: Time:1.3062 Method:cmd.php Processes:1 Threads:1 Hosts:1 HostsPerProcess:1 DataSources:5 RRDsProcessed:5

12. Setup Cacti

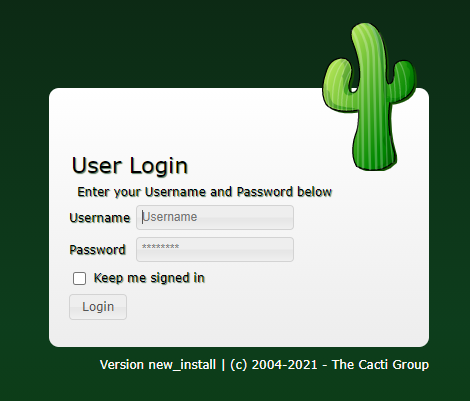
a. Go to the URL to start the installation of Cacti.

http://your.server.I.P/cacti

You will see something like.

b. Login
username: admin
password: admin

c. You will be prompt with password. Change accordingly.

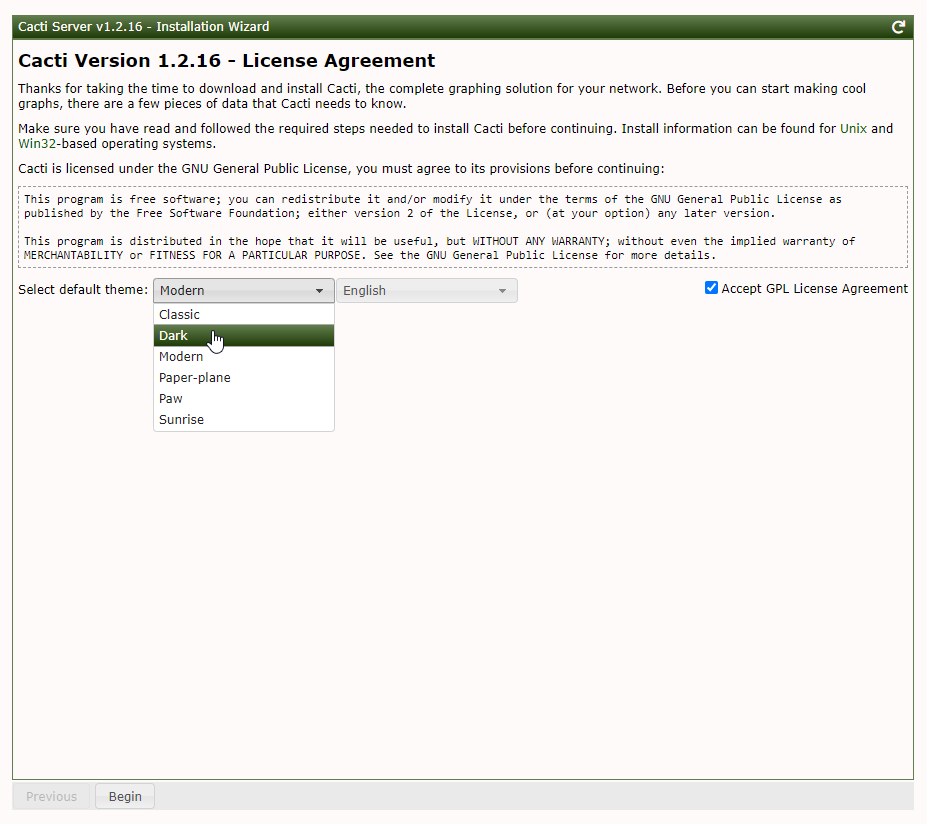
d. Accept GPL License Agreement, you can select default theme as per liking.

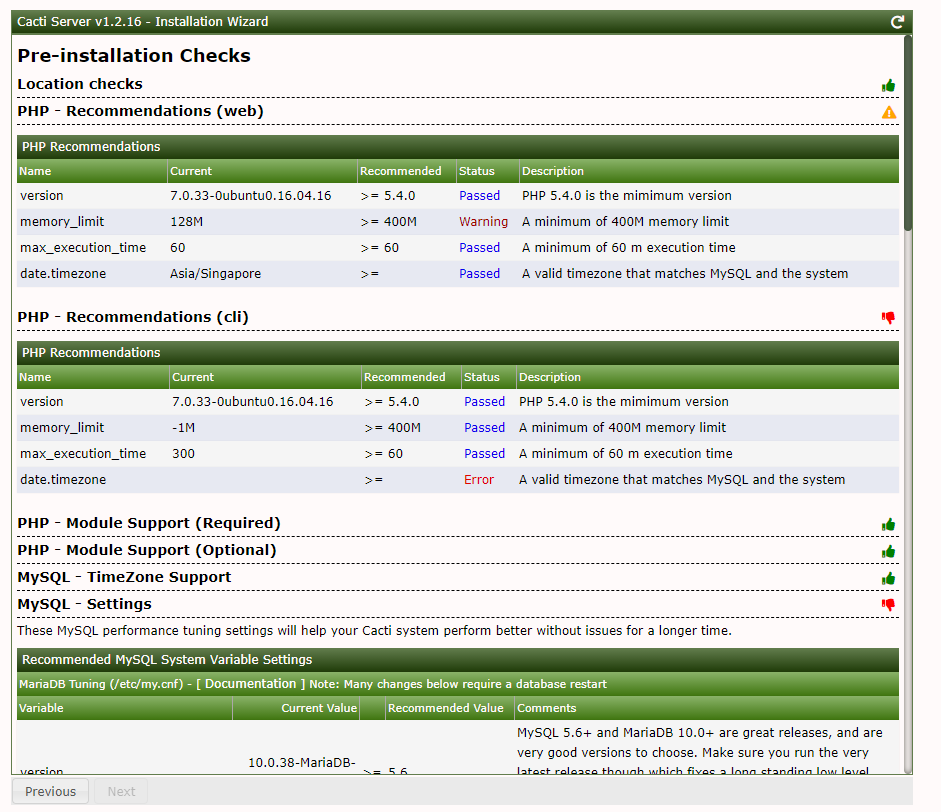
e. Pre-installation checks and will suggest recommendations. Fix accordingly.

Once fixed, you will see something like this:

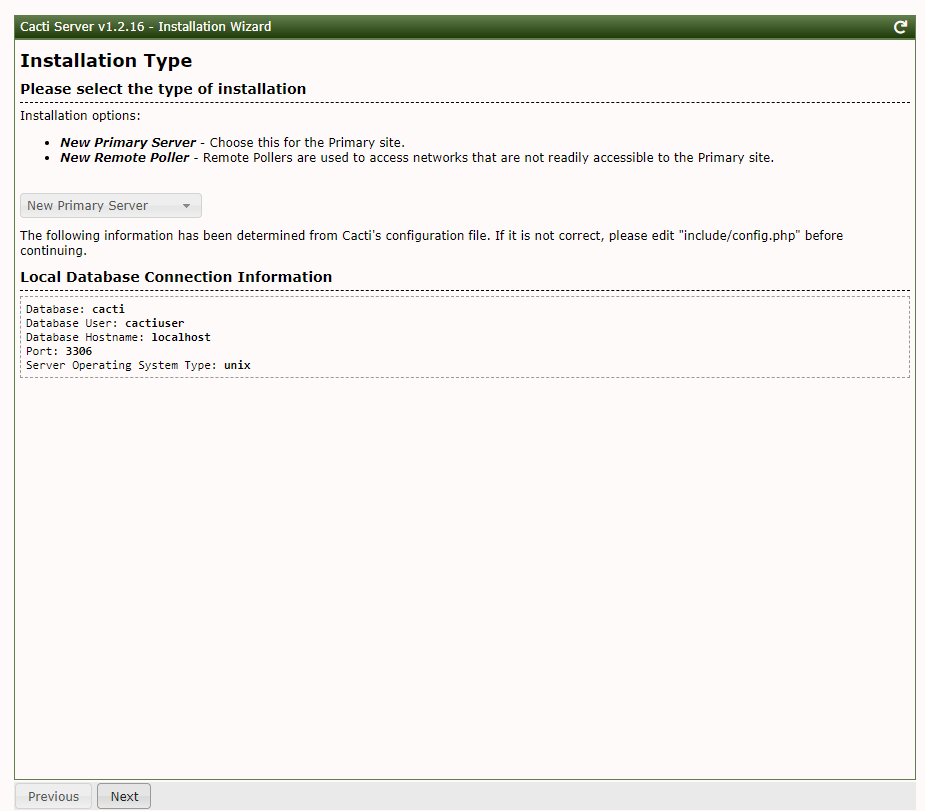
f. Select “New Primary Server” and click Next

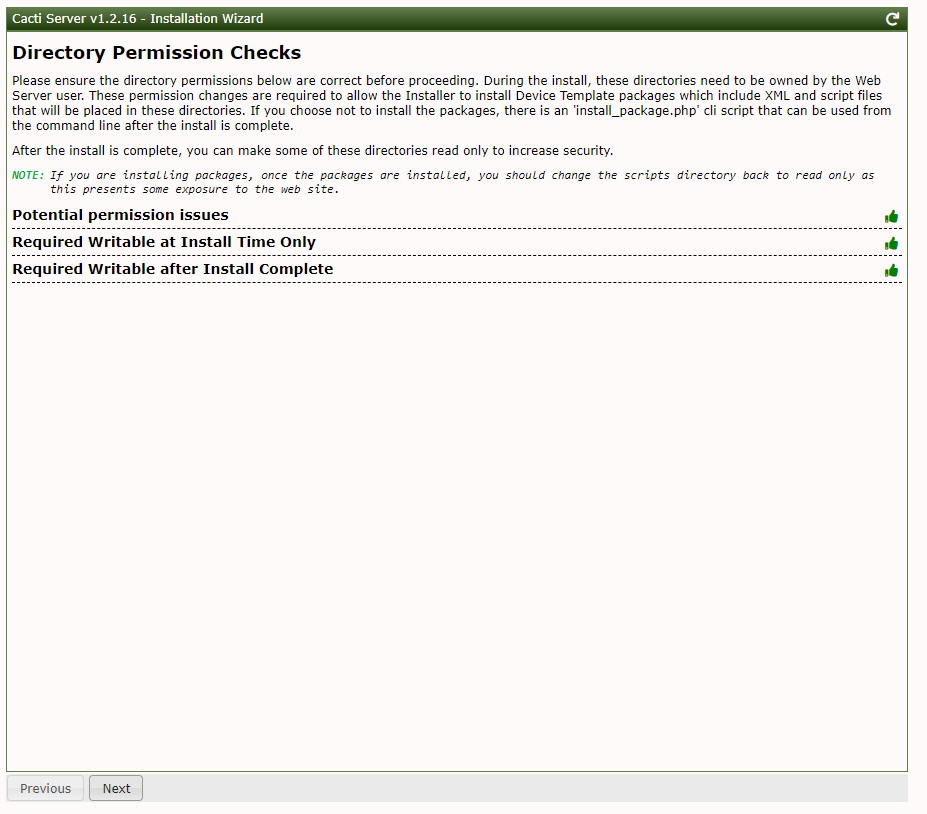
g. Directory permission Checks, click Next.

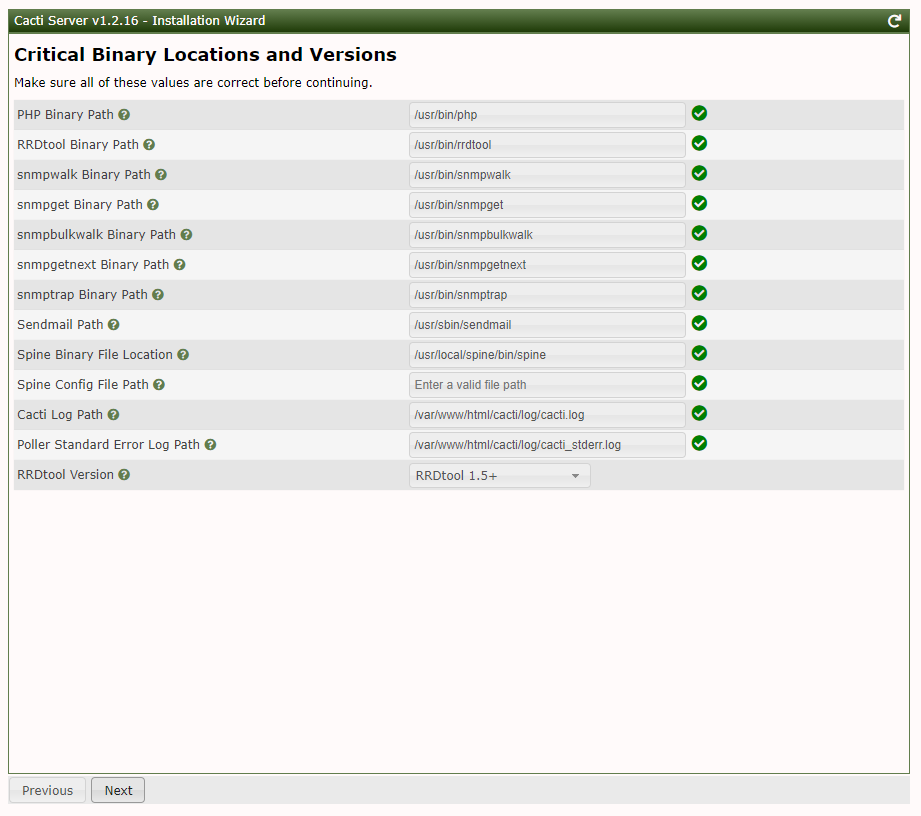
h. Critical binary locations and Versions page to see if there’s any missing. Click Next if no issue.

i.  Input validation Whitelist Protection page, click “I have read this statement” and click Next.

j. Default profile page, you can select 5 minutes for collection and cron interval. You can also input the Network Range to work out the range of IPs to be scanned.

k. Template Setup page info. Click Next.

l. Server Collation Page. Fixed the Warning as per instructed.

Sample how to fix  this ( I will not cover further about this because it can be different “Warning” message for other installation)

MariaDB [(none)]> ALTER DATABASE cacti CHARACTER SET utf8mb4 COLLATE utf8mb4_unicode_ci;
Query OK, 1 row affected (0.00 sec)
MariaDB [(none)]>exit

tux@labucs1:/etc/apache2/sites-enabled$ sudo systemctl restart mysql
tux@labucs1:/etc/apache2/sites-enabled$

Once fixed, you will see something like this.

m. Select “Confirm Installation”, and click Install.

n. Installation Wizards look like this. Once done, click “Get Started”.

13. Go to Cacti Dashboard. Login using “admin” and your password (Step 12.c)

See sample graph by accessing Graphs > Default Tree > Local Linux Machine. This is  your own Cacti server monitoring and performance data.

The post How to Install and Configure Cacti Network Monitoring on Ubuntu appeared first on Free Linux Tutorials.

Quick Tip: Configure SNMP on CentOS for Network Monitoring

$
0
0

CentOS = 192.168.15.22 (SNMP Client) (Tested on CentOS8)
Ubuntu = 192.168.15.19 (SNMP Server) (Tested on Ubuntu 16.04.7 LTS)

@CentOS
1. Install SNMP package

yum install net-snmp

Sample Output:
[root@centos~]# yum install net-snmp
Last metadata expiration check: 0:45:08 ago on Mon 22 Feb 2021 09:22:23 PM EST.
Dependencies resolved.
================================================================================
Package Arch Version Repo Size
================================================================================
Installing:
net-snmp x86_64 1:5.8-18.el8_3.1 appstream 354 k
Upgrading:
net-snmp-libs x86_64 1:5.8-18.el8_3.1 baseos 824 k
Installing dependencies:
lm_sensors-libs x86_64 3.4.0-21.20180522git70f7e08.el8 baseos 59 k
mariadb-connector-c x86_64 3.1.11-2.el8_3 appstream 200 k
mariadb-connector-c-config
noarch 3.1.11-2.el8_3 appstream 15 k
net-snmp-agent-libs x86_64 1:5.8-18.el8_3.1 appstream 747 k

Transaction Summary
================================================================================
Install 5 Packages
Upgrade 1 Package

Total download size: 2.1 M
Is this ok [y/N]: y
Downloading Packages:
(1/6): mariadb-connector-c-config-3.1.11-2.el8_ 789 kB/s | 15 kB 00:00
(2/6): mariadb-connector-c-3.1.11-2.el8_3.x86_6 4.5 MB/s | 200 kB 00:00
(3/6): lm_sensors-libs-3.4.0-21.20180522git70f7 2.6 MB/s | 59 kB 00:00
(4/6): net-snmp-5.8-18.el8_3.1.x86_64.rpm 3.3 MB/s | 354 kB 00:00
(5/6): net-snmp-libs-5.8-18.el8_3.1.x86_64.rpm 18 MB/s | 824 kB 00:00
(6/6): net-snmp-agent-libs-5.8-18.el8_3.1.x86_6 3.9 MB/s | 747 kB 00:00
——————————————————————————–
Total 2.2 MB/s | 2.1 MB 00:00


2. Configure SNMP community string and restart SNMP service

vi /etc/snmp/snmpd.conf

Syntax:
rocommunity “SNMPstring” “SNMPserverIP”

e.g.

rocommunity Fr33L1nuXTut0r14L5 localhost
rocommunity Fr33L1nuXTut0r14L5 192.168.15.19

Note: Comment also the line (recommended not to use “public” as community string)
#com2sec notConfigUser default public

Restart SNMP service:

service snmpd restart

Sample Output:
[root@centos~]# service snmpd restart
Redirecting to /bin/systemctl restart snmpd.service
[root@centos~]#

3. Test community string locally and remotely to verify configuration

Sample Output:
@CentOS SNMP client
[root@centos~]# snmpwalk -v2c -c Fr33L1nuXTut0r14L5 localhost system
SNMPv2-MIB::sysDescr.0 = STRING: Linux CentOS-Server 4.18.0-240.el8.x86_64 #1 SMP Fri Sep 25 19:48:47 UTC 2020 x86_64
SNMPv2-MIB::sysObjectID.0 = OID: NET-SNMP-MIB::netSnmpAgentOIDs.10
DISMAN-EVENT-MIB::sysUpTimeInstance = Timeticks: (7591) 0:01:15.91

@Ubuntu SNMP server (Test if SNMP is working remotely). Use the following syntax below:

sudo snmpwalk -v2c -c “SNMPcommstring” “IP of SNMP client”

Sample Output:
tux@ubuntu:~$ sudo snmpwalk -v2c -c Fr33L1nuXTut0r14L5 192.168.15.22 system
[sudo] password for tux:
Timeout: No Response from 192.168.15.22

As observed, snmpwalk is unsuccessful even though we already added the SNMP server IP (192.168.15.19) in CentOS SNMP configuration (Step2). One thing to check is if there’s a firewall preventing SNMP requests.

4. Allow SNMP service in firewall
Note: For older version of CentOS, you need to inspect the “iptables” rule if there’s anything preventing SNMP requests

iptables -L

Sample Output:
[root@centos ~]# iptables -L
Chain INPUT (policy ACCEPT)
target prot opt source destination

Chain FORWARD (policy ACCEPT)
target prot opt source destination

Chain OUTPUT (policy ACCEPT)
target prot opt source destination

Notice there is no rules, but if there is such you can add iptables rule, something like this:

iptables -I INPUT -p udp -m udp –dport 161 -j ACCEPT
iptables -I INPUT -p udp -m udp –dport 162 -j ACCEPT

Sample Output:
[root@centos~]# iptables -I INPUT -p udp -m udp –dport 161 -j ACCEPT
[root@centos~]# iptables -I INPUT -p udp -m udp –dport 162 -j ACCEPT
[root@centos~]# iptables -L
Chain INPUT (policy ACCEPT)
target prot opt source destination
ACCEPT udp — anywhere anywhere udp dpt:snmptrap
ACCEPT udp — anywhere anywhere udp dpt:snmp

Chain FORWARD (policy ACCEPT)
target prot opt source destination

Chain OUTPUT (policy ACCEPT)
target prot opt source destination

Save config: (permanently)

iptables-save > /etc/sysconfig/iptables

Else, need to allow in “firewalld” as it replaced “iptables” for newer version.

Steps:
(Optional: to verify if it is your firewalld causing why SNMP server cannot poll your server, you can stop the firewall first then try to snmpwalk again.
Sample:
@CentOS

service firewalld stop

Sample Output:
[root@centos~]# service firewalld stop
Redirecting to /bin/systemctl stop firewalld.service

@Ubuntu (After firewall stop)

tux@ubuntu:~$ sudo snmpwalk -v2c -c Fr33L1nuXTut0r14L5 192.168.15.22 system
SNMPv2-MIB::sysDescr.0 = STRING: Linux CentOS-Server 4.18.0-240.el8.x86_64 #1 SMP Fri Sep 25 19:48:47 UTC 2020 x86_64
SNMPv2-MIB::sysObjectID.0 = OID: NET-SNMP-MIB::netSnmpAgentOIDs.10
DISMAN-EVENT-MIB::sysUpTimeInstance = Timeticks: (33338) 0:05:33.38

Success! Then we know it is the firewall.

@CentOS Configure the firewalld

a. List first existing zone

firewall-cmd – -list-all-zones

Sample Output: (some is ommited, showing only the default “public” zone)
[root@centos~]# firewall-cmd – -list-all-zones
public (active)
target: default
icmp-block-inversion: no
interfaces: ens3
sources:
services: cockpit dhcpv6-client
ports:
protocols:
masquerade: no
forward-ports:
source-ports:
icmp-blocks:
rich rules:

b. Add the rule

firewall-cmd – -permanent – -add-service=snmp

Sample Output:
[root@centos~]# firewall-cmd –permanent –add-service=snmp
FirewallD is not running
[root@centos~]# service firewalld start
Redirecting to /bin/systemctl start firewalld.service
[root@centos~]# firewall-cmd –permanent –add-service=snmp
success

c. Reload firewalld configuration to take effect

firewall-cmd – -reload

Sample Output:
[root@centos~]# firewall-cmd – -reload
success

d. Verify config:

Sample Output: (after adding)
[root@centos~]# firewall-cmd – -list-all-zones
public (active)
target: default
icmp-block-inversion: no
interfaces: ens3
sources:
services: cockpit dhcpv6-client snmp
ports:
protocols:
masquerade: no
forward-ports:
source-ports:
icmp-blocks:
rich rules:

5. Verify to see if SNMP is working
@Ubuntu SNMP server

Sample Output:
tux@ubuntu:~$ sudo snmpwalk -v2c -c Fr33L1nuXTut0r14L5 192.168.15.22 system
SNMPv2-MIB::sysDescr.0 = STRING: Linux CentOS-Server 4.18.0-240.el8.x86_64 #1 SMP Fri Sep 25 19:48:47 UTC 2020 x86_64
SNMPv2-MIB::sysObjectID.0 = OID: NET-SNMP-MIB::netSnmpAgentOIDs.10
DISMAN-EVENT-MIB::sysUpTimeInstance = Timeticks: (65567) 0:10:55.67
SNMPv2-MIB::sysContact.0 = STRING: Root <root@centos> (configure /etc/snmp/snmp.local.conf)
SNMPv2-MIB::sysName.0 = STRING: CentOS-Server
SNMPv2-MIB::sysLocation.0 = STRING: Unknown (edit /etc/snmp/snmpd.conf)
SNMPv2-MIB::sysORLastChange.0 = Timeticks: (1) 0:00:00.01
SNMPv2-MIB::sysORID.1 = OID: SNMP-FRAMEWORK-MIB::snmpFrameworkMIBCompliance

If SNMP walk/get is working, then it is ready to add it on your preferred NMS like Cacti. To configure Cacti as your Network Monitoring System , you can refer to this link –> How to Install and Configure Cacti Network Monitoring on Ubuntu

The post Quick Tip: Configure SNMP on CentOS for Network Monitoring appeared first on Free Linux Tutorials.
NET-TOOLS vs IPROUTE Cheat Sheet (ifconfig vs ip)

$
0
0

The net-tools has been deprecated and plans to obsolete was stated from debian-devel mailing list around 2009 (https://lists.debian.org/debian-devel/2009/03/msg00780.html ) . As per the post, it says:

It doesnt support many of the modern features of the linux kernel, the interface is far from optimal and difficult to use in automatisation, and also, it hasn’t got much love in the last years.

On the other side, the iproute suite, introduced around the 2.2 kernel line, has both a much better and consistent interface, is more powerful, and is almost ten years old, so nobody would say it’s untested.

So it’s time to familiarize and start using iproute over the net-tools. Here’s the table comparison of commands for your reference.

NET-TOOLS IPROUTE Description
ifconfig ip link Network device configuration
ifconfig -h ip help Print help
ifconfig -a ip  a Display all interfaces
ifconfig -a ip -4 a Display for family inet (ipv4)
ifconfig -a ip -6 a Display for family inet6 (ipv6)
ifconfig [int_name] ip a show [int_name] Display single interface
ifconfig [int_name] down ip link set [int_name] down Shutdown interface
ifconfig [int_name] up ip link set [int_name] up Activate interface
ifconfig eth0 hw ether 00:00:00:00:00:aa ip link set dev eth0 address 00:00:00:00:00:aa Change MAC address
ifconfig eth0 down
nameif eth1 00:00:00:00:00:aa
ifconfig eth1 up
ip link set dev eth0 down
ip link set dev eth0 name eth1
ip link set dev eth1 up
Rename interface (e.g eth0 to eth1)
ifconfig eth0  delete 192.168.0.100 ip addr del 192.168.0.100/24 dev eth0 Delete IPv4 address
ifconfig eth0 192.168.0.100 netmask 255.255.255.0 ip addr add 192.168.0.100/24 dev eth0 Add IPv4 address
ifconfig eth1 inet6 add 2002:bbaa:0:f000::1/64 ip -6 addr add 2002:bbaa:0:f000::1/64 dev eth1 Add IPv6 address
ifconfig eth0 0.0.0.0 ip addr del 192.168.0.100/24 dev eth0 Clear associated IP in interface
ifconfig eth0:0 192.168.0.100 netmask 255.255.255.0 ip addr add 192.168.0.100/24 dev eth0 label eth0:0 Create an alias in interface
ifconfig eth0:0 down ip addr del 192.168.0.100/24 dev eth0 Delete an alias
ifconfig eth0 mtu 1500 ip link set dev eth0 mtu 1500 Changeinterface  MTU
ifconfig eth0 arp ip link set dev eth0 arp on Enable ARP protocol
ifconfig eth0 -arp ip link set dev eth0 arp off Disable ARP protocol
ifconfig eth0 promisc ip link set dev eth0 promisc on Enable promiscuous mode
ifconfig eth0 -promisc ip link set dev eth0 promisc off Disable promiscuous mode
ifconfig eth0 multicast ip link set dev eth0 multicast on Enable Multicast
ifconfig eth0 -multicast ip link set dev eth0 multicast off Disable Multicast
ifconfig eth0 allmulti ip link set dev eth0 allmulticast on Enable All-Multicast
ifconfig eth0 -allmulti ip link set dev eth0 allmulticast off Disable All-Multicast
route -n ip route Display routing table
route add default gw 192.168.0.1 ip route add default via 192.168.0.1 Configure Default gateway
route del default gw 192.168.0.1 ip route del default via 192.168.0.1 Delete default gateway
route add -net 192.168.110.0 netmask 255.255.255.0 gw 192.168.0.1 dev eth1 ip route add 192.168.110.0/24 via 192.168.0.1 dev eth1 Add static route
route del -net 192.168.110.0 netmask 255.255.255.0 ip route del 192.168.110.0/24 Remove static route
arp -a ip neigh Display ARP
arp -v ip -s neigh Display ARP statistics
vconfig add eth0 10 ip link add eth0.10 link eth0 type vlan id 10 Create VLAN interface
vconfig rem eth0.10 ip link del dev eth0.10 Remove VLAN interface
netstat ss Print socket statistics
netstat -l ss -l Display only listening sockets
netstat -nr ip route show Display routing table
netstat -g ip maddr Display Multicast address
ipmaddr ip maddress multicast addresses management
iptunnel ip tunnel Configure tunnel

The post NET-TOOLS vs IPROUTE Cheat Sheet (ifconfig vs ip) appeared first on Free Linux Tutorials.
Quick Reference: AWS vs Openstack Comparison

$
0
0

Table comparison between the these popular Cloud Computing platforms, Amazon Web Services (AWS) and Openstack based on services.

Services AWS Openstack
Compute VM Instance
Virtual Servers EC2 Nova Instance
Dashboard/GUI Console Horizon
Dockers ECS Magnum
Load Balancing Elastic Load Balancing(ELB) LBaas
API EC2 API Openstack API
Block Storage EBS Cinder
Object Storage S3 Swift
Networking Networking Neutron
Identity Service IAM Keystone
Heat Cloudformation Heat
Image Service AMZ Machine Images Glance
Telemetry/Billing AWS Usage/Billing Report Ceilometer
Monitoring Cloudwatch Ceilometer
Database(Relational) RDS Trove
NoSQL DynamoDB Trove
DNS Management Route53 Designate

The post Quick Reference: AWS vs Openstack Comparison appeared first on Free Linux Tutorials.


Top 5 Favorite Command Line Web Browsers for Linux

$
0
0

Below are my top 5 favorite Linux’s text-based or command line web browsers. The sample look screencapture was done using putty ssh session, using default appearance.

  1. lynx

Redhat-based/CentOS:

yum install lynx

Debian-based/Ubuntu:

sudo apt install lynx

Sample Look:
tux@freelinux:~$ lynx freelinuxtutorials.com

2. elinks

Redhat-based/CentOS:

yum install elinks

Debian-based/Ubuntu:

sudo apt install elinks

Sample Look:
tux@freelinux:~$ elinks freelinuxtutorials.com

3. links/links2

Redhat-based/CentOS:

yum install links

Debian-based/Ubuntu:

sudo apt install links

Sample Look:
tux@freelinux:~$ links freelinuxtutorials.com

4. w3m

Debian-based/Ubuntu:

sudo apt install w3m

Sample Look:
tux@freelinux:~$ w3m freelinuxtutorials.com

5. netrik

Debian-based/Ubuntu:

sudo apt install netrik

Sample Look:
tux@freelinux:~$ netrik freelinuxtutorials.com

Honorable mention:
There are few more web browsers for Linux but installation may not be straightforward using “yum” or “apt”.

brow.sh (modern text-based browser)

Installation:

Debian-based:

wget https://github.com/browsh-org/browsh/releases/download/v1.6.4/browsh_1.6.4_linux_amd64.deb
sudo apt install ./browsh_1.6.4_linux_amd64.deb

Redhat-based:

curl -o browsh.rpm -L https://github.com/browsh-org/browsh/releases/download/v1.6.4/browsh_1.6.4_linux_amd64.rpm
rpm -Uvh ./browsh.rpm

Run:

browsh

CTRL+l = open the URL bar
CTRL+q =quit

Sample Look:

The post Top 5 Favorite Command Line Web Browsers for Linux appeared first on Free Linux Tutorials.
Top 3 Command Line Text Editors for Linux

$
0
0

My Top 3 Terminal Text Editors for Linux:

1.vi/vim (vim-minimal/vim-enhanced) Vi IMproved, a programmer’s text editor
DESCRIPTION
Vim is a text editor that is upwards compatible to Vi. It can be used
to edit all kinds of plain text. It is especially useful for editing
programs.

Redhat-based/CentOS:

yum install vim

Debian-based/Ubuntu:

sudo apt install vim

Syntax:
vim [options] [file ..

Sample Look:
tux@freelinux:~$ vim freelinux.txt

Tip: You can run “vimtutor” to learn vim commands

vimtutor

Popular commands that I frequently use:

Inserting/Appending
Esc – exit insert mode
i – insert before the cursor
I – insert at the beginning of the line
a – insert (append) after the cursor
A – insert (append) at the end of the line

Editing
r – replace a single character
u – undo
. – repeat last command

Exiting
:q – quit (fails if there are unsaved changes)
:q! or ZQ – quit and throw away unsaved changes
:wq or : x or ZZ – write (save) and quit
:w – write (save) the file, but don’t exit

Search and replace
/pattern – search for pattern
n – repeat search in same direction
N – repeat search in opposite direction
:%s/old/new/g – replace all old with new throughout file
:%s/old/new/gc – replace all old with new throughout file but with confirmation

Cut and paste
yy – copy a line
p – put (paste) the clipboard after cursor
P – put (paste) before cursorP – put (paste) before cursor
dd – delete (cut) a line
2dd – delete (cut) 2 lines

Additional:
:$ – go to last line

2. nano (Nano’s ANOther editor, an enhanced free Pico clone)
DESCRIPTION
nano is a small, free and friendly editor which aims to replace Pico,the default editor included in the non-free Pine package. On top of copying Pico’s look and feel, nano also implements some missing (or disabled by default) features in Pico, such as “search and replace” and “go to line and column number”.

Redhat-based/CentOS:

yum install nano

Debian-based/Ubuntu:

sudo apt install nano

Syntax:
nano [options] [[+line[,column]] file]…

Sample Look:
tux@freelinux:~$ nano freelinux.txt

Popular commands :
Ctrl+S Save current file
Ctrl+O Offer to write file (“Save as”)
Ctrl+R Insert a file into current one
Ctrl+X Close buffer, exit from nano
Ctrl+K Cut current line into cutbuffer
Ctrl+U Paste contents of cutbuffer

Cheatsheet for nano –> https://www.nano-editor.org/dist/latest/cheatsheet.html

Note:  In ubuntu, when you run “pico”, it will open “nano” as it is linked.
tux@labucs1:~$ ls -l /usr/bin/pico
lrwxrwxrwx 1 root root 22 Feb 28 2017 /usr/bin/pico -> /etc/alternatives/pico
tux@labucs1:~$ ls -l /etc/alternatives/pico
lrwxrwxrwx 1 root root 9 Feb 28 2017 /etc/alternatives/pico -> /bin/nano

3. emacs (GNU project Emacs editor)
DESCRIPTION
GNU Emacs is a version of Emacs, written by the author of the original
(PDP-10) Emacs, Richard Stallman. The user functionality of GNU Emacs
encompasses everything other editors do, and it is easily extensible
since its editing commands are written in Lisp.

Redhat-based/CentOS:

yum install emacs

Debian-based/Ubuntu:

sudo apt install emacs

Syntax:
emacs [ command-line switches ] [ files … ]

Sample Look:
tux@freelinux:~$ emacs freelinux.txt

Popular commands :
“C-x” means “press and hold the Control key and then press and release the “x” key

C-x C-c – quit
C-x C-s – save buffer
C-x C-f – open file
C-g – cancel
C-s – search
C-o – insert newline after cursor

Cheatsheet for emacs –>  https://www.gnu.org/software/emacs/refcards/pdf/refcard.pdf

There’s few honorable mentions, but installation may not be straightforward, comparing to those 3 above that can be installed via “apt install” or “yum install”.

  • neovim
  • micro
  • ne (nice editor)

The post Top 3 Command Line Text Editors for Linux appeared first on Free Linux Tutorials.
Top 5 Commands to display Hardware Information on Linux

$
0
0

Top 5 Commands to show Hardware Inventory Information in Linux

1.lshw (list hardware)
DESCRIPTION
lshw is a small tool to extract detailed information on the hardware configuration of the machine. It can
report exact memory configuration, firmware version, mainboard configuration, CPU version and speed, cache
configuration, bus speed, etc. on DMI-capable x86 or IA-64 systems and on some PowerPC machines (PowerMac
G4 is known to work).

Syntax:
lshw [options]

Popular options
lshw -short
lshw -html
lshw -xml
lshw -sanitize
lshw -c network

Installation:

Debian/Ubuntu:

sudo apt install lshw

Redhat/CentOS/Fedora

yum install lshw
dnf install lshw

Sample Output:
tux@labucs1:~$ lshw -short
WARNING: you should run this program as super-user.
H/W path Device Class Description
==========================================================
system Computer
/0 bus Motherboard
/0/2 memory 251GiB System memory
/0/3 processor Intel(R) Xeon(R) CPU E5-2630 v4 @ 2.20GHz
/0/4 processor Intel(R) Xeon(R) CPU E5-2630 v4 @ 2.20GHz
/0/100 bridge Xeon E7 v4/Xeon E5 v4/Xeon E3 v4/Xeon D DMI2
/0/100/1 bridge Xeon E7 v4/Xeon E5 v4/Xeon E3 v4/Xeon D PCI Express Root

Or save into html file:
tux@labucs1:~$ sudo lshw -html > lshw.html

1.1 lscpu (display information about the CPU architecture)
DESCRIPTION
lscpu gathers CPU architecture information from sysfs and /proc/cpuinfo. The command output can be optimized for parsing or for easy readability by humans.

Syntax:
lscpu [-a|-b|-c] [-x] [-s directory] [-e[=list]|-p[=list]]

Popular options
lshw -short
lshw -html
lshw -xml
lshw -sanitize

Installation:

Debian/Ubuntu:

sudo apt install util-linux

Redhat/CentOS/Fedora

yum install util-linux
dnf install util-linux

Sample Output:

1.2 lspci (list all PCI devices)
DESCRIPTION
lspci is a utility for displaying information about PCI buses in the system and devices connected to them.

Syntax:
lspci [options]

Popular options

Installation:

Debian/Ubuntu:

sudo apt install pciutils

Redhat/CentOS/Fedora

yum install pciutils
dnf install pciutils

Sample Output:

1.3. Other ls*** are:
lsblk (included when installing util-linux)

lsusb

sudo apt install usbutil

lsscsi

sudo apt install lsscsci


2.dmidecode (DMI table decoder)
dmidecode is a tool for dumping a computer’s DMI (some say SMBIOS) table contents in a human-readable format. This table contains a description of the system’s hardware components, as well as other useful pieces of information such as serial numbers and BIOS revision.

Syntax:
dmidecode [options]

Popular options:

dmidecode -t [options]
e.g.
dmidecode -t system
dmidecode -t memory
dmidecode -t processor
dmidecode -s [options]

Installation:

Debian/Ubuntu:

sudo apt install dmidecode

Redhat/CentOS/Fedora

yum install dmidecode
dnf install dmidecode

Sample Output:
tux@labucs1:~$ sudo dmidecode -t 1
# dmidecode 3.0
Getting SMBIOS data from sysfs.
SMBIOS 3.0 present.
Handle 0x0001, DMI type 1, 27 bytes
System Information
Manufacturer: Cisco Systems Inc
Product Name: UCSC-C240-M4SX
Version: A0
Serial Number: ABCDEFG
UUID: F78355BB-B3AA-BB4B-CCF5-EE9C7A21935A
Wake-up Type: Power Switch
SKU Number: Not Specified
Family: Not Specified


3.hwinfo (probe for hardware)
DESCRIPTION
hwinfo is used to probe for the hardware present in the system. It can be used to generate a system overview log which can be later used for support.

Syntax:
hwinfo [options]

Popular options:
hwinfo –short
hwinfo –short –cpu
hwinfo –short –netcard
hwinfo –short –storage

Installation:

Debian/Ubuntu:

sudo apt install hwinfo

Fedora

dnf install hwinfo

Sample Output:
tux@labucs1:~$ hwinfo –short –storage
storage:
Intel C610/X99 series chipset 6-Port SATA Controller [AHCI mode]
Cisco VIC FCoE HBA
Cisco VIC FCoE HBA
LSI Logic / Symbios Logic MegaRAID SAS-3 3108 [Invader]


4. inxi (Command line system information script for console and IRC)
DESCRIPTION
inxi is a command line system information script built for for console
and IRC. It is also used for forum technical support, as a debugging
tool, to quickly ascertain user system configuration and hardware.

Syntax:
inxi [-AbCdDfFGhHiIlmMnNopPrRsSuw] [-c NUMBER] [-v NUMBER]

Popular options:
inxi -S  –> System
inxi -M –> Machine
inxi -C –> CPU
inxi -G –> Graphics
inxi -N –> Network
inxi -A –> Audio
inxi -D –> Disk
inxi -s –> sensor
inxi -b –> basic info
inxi -F –> full info

Installation:

Debian/Ubuntu:

sudo apt install inxi

Fedora

dnf install inxi

Note: Use this command to to check for programs to operate.

inxi –recommends

Sample Output:
tux@labucs1:~$ inxi –recommends
inxi will now begin checking for the programs it needs to operate. First a check of the main languages and tools
inxi uses. Python is only for debugging data collection.
—————————————————————————
Bash version: 4.3.48(1)-release
Gawk version: 4.1.3,
Sed version:
Sudo version: 1.8.16
Python version: 2.7.12
—————————————————————————
Test One: Required System Directories (Linux Only).
If one of these system directories is missing, inxi cannot operate:

/proc…………………………………………………………….. Present
/sys……………………………………………………………… Present
—————————————————————————
All tests completed

Sample Output:
tux@labucs1:~$ inxi -s
Sensors: System Temperatures: cpu: 37.0C mobo: N/A
Fan Speeds (in rpm): cpu: N/A

tux@labucs1:~$ inxi -b -s
System: Host: labucs1 Kernel: 4.4.0-169-generic x86_64 (64 bit) Console: tty 9 Distro: Ubuntu 16.04 xenial
Machine: System: Cisco Systems product: UCSC-C240-M4SX v: A0
Mobo: Cisco Systems model: UCSC-C240-M4SX v: 74-12420-02
Bios: Cisco Systems v: C240M4.2.0.13d.0.0812161132 date: 08/12/2016
CPU(s): 2 Deca core Intel Xeon E5-2630 v4s (-HT-MCP-SMP-) speed/max: 1199/3100 MHz
Graphics: Card: Matrox Systems MGA G200e [Pilot] ServerEngines (SEP1)
Display Server: X.org 1.18.4 drivers: mga (unloaded: fbdev,vesa)
tty size: 116×42 Advanced Data: N/A out of X
Network: Card-1: Cisco Systems VIC Ethernet NIC driver: enic
Card-2: Cisco Systems VIC Ethernet NIC driver: enic
Card-3: Intel Ethernet Controller X710 for 10GbE SFP+ driver: i40e

5.  Displaying info from these folders:
a. /proc/
e.g. cpuinfo,meminfo,

Sample Output:
tux@labucs1:~$ tux@labucs1:~$ head /proc/cpuinfo
processor : 0
vendor_id : GenuineIntel
cpu family : 6
model : 79
model name : Intel(R) Xeon(R) CPU E5-2630 v4 @ 2.20GHz
stepping : 1
microcode : 0xb000038
cpu MHz : 1242.140
cache size : 25600 KB
physical id : 0

b. /sys/devices/virtual/dmi/id/
tux@labucs1:~$ ls /sys/devices/virtual/dmi/id/
e.g., chassis_version, board_vendor, chassis_type,product_version
board_asset_tag board_version chassis_vendor product_name subsystem

Sample Output:
tux@labucs1:~$ cat /sys/devices/virtual/dmi/id/product_name
UCSC-C240-M4SX

The post Top 5 Commands to display Hardware Information on Linux appeared first on Free Linux Tutorials.
Top 5 Open-Source Web Servers on Linux

$
0
0

My Top 5 Open-Source Web Servers on Linux (2021)

1.Apache
is a free and open-source cross-platform web server software and actively maintained by the Apache Software Foundation.
It is the most popular web server in the world as it powers around 44+% of the website.
Some basic features and support:
-Loadable dynamic modues
-.htaccess
-IPv6 compatible
-Geolocation based on IP
-Bandwidth throttling and Load balancing

Installation:

Debian/Ubuntu:

sudo apt install httpd

Redhat/CentOS

yum install httpd

Fedora:

dnf install httpd

2. Nginx
-is open source software for web serving, reverse proxying, caching, load balancing, media streaming and the project started with strong focus on maximum performance, high concurrency and low memory usage.

Installation:

Debian/Ubuntu:

sudo apt install nginx

Redhat/CentOS

yum install nginx

Fedora:

dnf install nginx

3.Lighttpd
-is an open-source,lightweight,secure and high performance web server that is optimized for speed-critical environments.

Installation:

Debian/Ubuntu:

sudo apt install lighttpd

Redhat/CentOS

yum install lighttpd

Fedora:

dnf install lighttpd

4.Caddy
-is a powerful, enterprise-ready, open source security-focused web server with automatic HTTPS written in Go.

Installation:

Debian/Ubuntu:

sudo apt install caddy

Redhat/CentOS (enable EPEL repository first)

yum install caddy

Fedora:

dnf install caddy

5.OpenLiteSpeed
-is open source edition of LiteSpeed Web Server enterprise. It is a high-performance and lightweight web server developed by LiteSpeed Technologies.

Installation:

Debian/Ubuntu:

sudo apt install openlitespeed

Redhat/CentOS

yum install openlitespeed

Honorable Mention:

Cherokee
– is an innovative, feature rich, lightning fast and easy to configure open source web server designed for the next generation of highly concurrent secured web applications.

Installation: (it won’t be straightforward  as need to do few steps prior to “apt” or “yum” installation)

Debian/Ubuntu:

sudo apt install cherokee

Redhat/CentOS

yum install cherokee

The post Top 5 Open-Source Web Servers on Linux appeared first on Free Linux Tutorials.
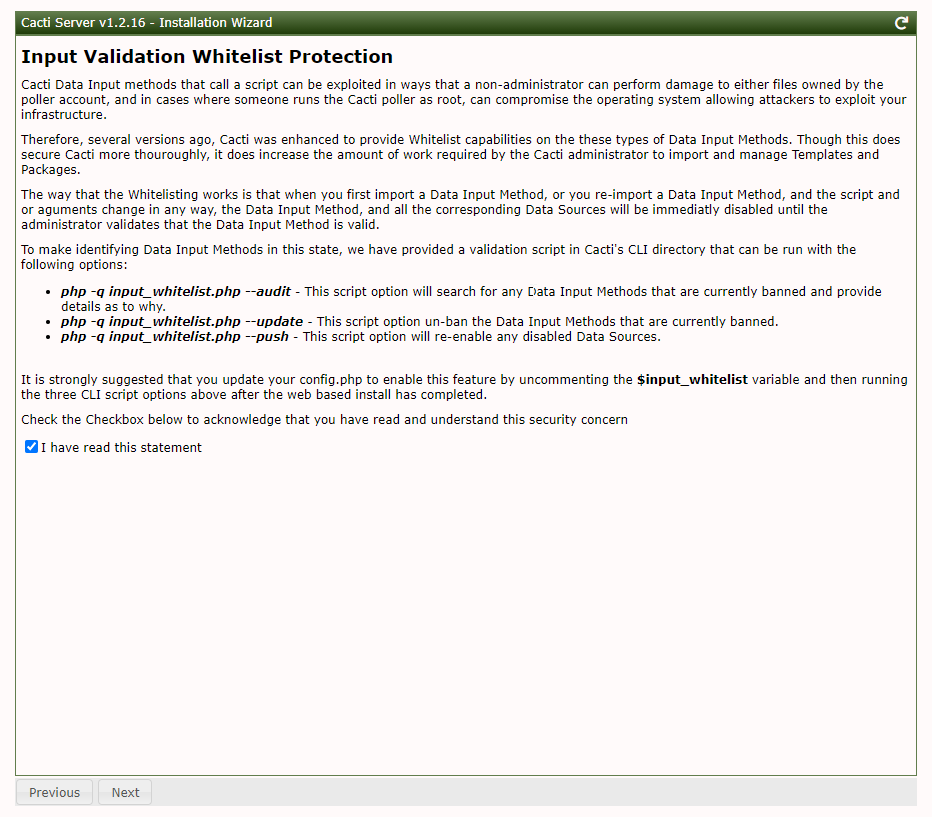
Quick Tip: Screenfetch Installation in CentOS Linux

$
0
0

If you haven’t install screenfetch, you will normally see a command not found error message something like this below:

[root@CentOS-Server ~]# screenfetch
bash: screenfetch: command not found…

Steps in Installing Screenfetch in CentOS Linux

1. Install Git

yum install git

Sample Output:
[root@CentOS-Server ~]# yum install git
Last metadata expiration check: 2:23:47 ago on Mon 29 Mar 2021 12:45:50 PM +08.
Dependencies resolved.
===================================================================================================================================================================================================================
Package Architecture Version Repository Size
===================================================================================================================================================================================================================
Installing:
git x86_64 2.27.0-1.el8 appstream 164 k
Installing dependencies:
git-core-doc noarch 2.27.0-1.el8 appstream 2.5 M
perl-Error noarch 1:0.17025-2.el8 appstream 46 k
perl-Git noarch 2.27.0-1.el8 appstream 77 k
perl-TermReadKey x86_64 2.37-7.el8 appstream 40 k

Transaction Summary
===================================================================================================================================================================================================================
Install 5 Packages
Total download size: 2.8 M
Installed size: 12 M
Is this ok [y/N]: y
Downloading Packages:
(1/5): perl-Error-0.17025-2.el8.noarch.rpm 2.0 MB/s | 46 kB 00:00
(2/5): git-2.27.0-1.el8.x86_64.rpm 5.8 MB/s | 164 kB 00:00
(3/5): perl-Git-2.27.0-1.el8.noarch.rpm 9.8 MB/s | 77 kB 00:00
(4/5): perl-TermReadKey-2.37-7.el8.x86_64.rpm 9.2 MB/s | 40 kB 00:00
(5/5): git-core-doc-2.27.0-1.el8.noarch.rpm 19 MB/s | 2.5 MB 00:00
——————————————————————————————————————————————————————————————————————-
Total 4.7 MB/s | 2.8 MB 00:00
Running transaction check
Transaction check succeeded.
Running transaction test
Transaction test succeeded.
Running transaction
Preparing : 1/1
Installing : perl-TermReadKey-2.37-7.el8.x86_64 1/5
Installing : perl-Error-1:0.17025-2.el8.noarch 2/5
Installing : git-core-doc-2.27.0-1.el8.noarch 3/5
Installing : perl-Git-2.27.0-1.el8.noarch 4/5
Installing : git-2.27.0-1.el8.x86_64 5/5
Running scriptlet: git-2.27.0-1.el8.x86_64 5/5
Verifying : git-2.27.0-1.el8.x86_64 1/5
Verifying : git-core-doc-2.27.0-1.el8.noarch 2/5
Verifying : perl-Error-1:0.17025-2.el8.noarch 3/5
Verifying : perl-Git-2.27.0-1.el8.noarch 4/5
Verifying : perl-TermReadKey-2.37-7.el8.x86_64 5/5
Installed products updated.

Installed:
git-2.27.0-1.el8.x86_64 git-core-doc-2.27.0-1.el8.noarch perl-Error-1:0.17025-2.el8.noarch perl-Git-2.27.0-1.el8.noarch perl-TermReadKey-2.37-7.el8.x86_64

Complete!

2. Git Clone from Github

git clone git://github.com/KittyKatt/screenFetch.git screenfetch

Sample Output:
[root@CentOS-Server ~]# git clone git://github.com/KittyKatt/screenFetch.git screenfetch
Cloning into ‘screenfetch’…
remote: Enumerating objects: 38, done.
remote: Counting objects: 100% (38/38), done.
remote: Compressing objects: 100% (31/31), done.
remote: Total 4175 (delta 20), reused 13 (delta 7), pack-reused 4137
Receiving objects: 100% (4175/4175), 4.38 MiB | 3.64 MiB/s, done.
Resolving deltas: 100% (2408/2408), done.

3. Copy the screenfetch file to /usr/bin/ folder

cp screenfetch/screenfetch-dev /usr/bin/screenfetch

Sample Output:
[root@CentOS-Server ~]# cp screenfetch/screenfetch-dev /usr/bin/screenfetch
[root@CentOS-Server ~]#

4. Make the file executable

chmod +x /usr/bin/screenfetch

Sample Output:
[root@CentOS-Server ~]# chmod +x /usr/bin/screenfetch
[root@CentOS-Server ~]#


5. Run

screenfetch

Sample Output:

The post Quick Tip: Screenfetch Installation in CentOS Linux appeared first on Free Linux Tutorials.
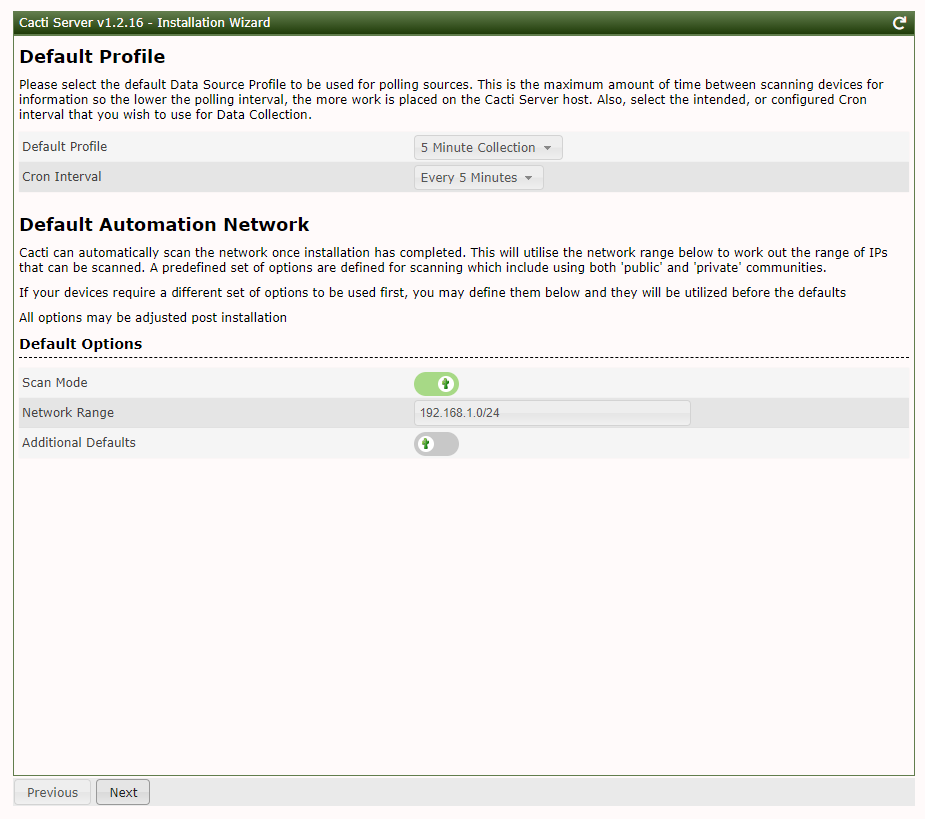
Top 15 Services to Remove for Securing Ubuntu Linux

$
0
0

As part of the Best Security Practices, it is recommended to disable all services that are not required for normal operation to prevent the vulnerabilities exploitation of these services.

These are the following services that need to audit, uninstall or remove to reduce the number of possible threats.

1.  Internet Service Daemon(Inetd) / eXtended Internet Daemon (Xinetd)
-is a super-server daemon that provides Internet services. Xinetd replaced the original inetd, and listens for well known services.

Command to check if xinetd is installed or not:

dpkg -s xinetd

Recommendation: Remove the package/s to reduce attack area

apt purge xinetd


2. X Windows System

– this provides the Graphical User Interface or GUI for users to have graphical login access, and interact with a mouse and keyboard.

Command to check if X Windows System is installed or not:

dpkg -l xserver-xorg*

Recommendation: Remove the package/s to reduce attack area

apt purge xserver-xorg*

3.  Common Unix Print System (CUPS)
– this enables a system to function as a print server

Command to check if CUPS is installed or not:

dpkg -s cups

Recommendation: Remove the package/s if system does not act as the Print Server to reduce attack area

apt purge cups

4. Avahi Server
-is a system that facilitates service discovery on a local network via the mDNS/DNS-SD protocol suite. It is a free zeroconf implementation that allows programs to discover and publish services or hosts running on a local network with no specific config.


Command to check if Avahi Server is installed or not:

dpkg -s avahi-daemon

Recommendation: Remove the package/s

systemctl stop avahi-daaemon.service
systemctl stop avahi-daemon.socket
apt purge avahi-daemon

5. Lightweight Directory Access Protocol (LDAP) Server
– is an open and cross platform software protocol that is used for directory services authentication.

Command to check if LDAP  is installed or not:

dpkg -s slapd

Recommendation: Remove the package if the system is not acting as the LDAP server to reduce attack area.

apt purge slapd

6. Network File System (NFS)
-it is a distributed file system protocol that enables user to access remote data and files , retrieval of data from multiple directories and disks across a shared network

Command to check if NFS is installed or not:

dpkg -s nfs-kernel-server

Recommendation: Remove the package if the system is not acting as the NFS server to reduce attack area.

apt purge rpcbind

7.  File Transfer Protocol (FTP) Server
-is a network protocol for transferring of files between computers .

Command to check if FTP is installed or not: (default installed is the VSFTP)

dpkg -s vsftpd

Recommendation: Remove the package if the system is not acting as the FTP server to reduce attack area.

apt purge vsftpd


8. Samba Server
– it allows system admin to share file systems and directory with Windows desktops, via the Server Message Block (SMB) protocol.

Command to check if Samba is installed or not:

dpkg -s samba

Recommendation: Remove the package if the system is not acting as the FTP server to reduce attack area.

apt purge samba

9. Network Information Service (NIS)
-is a client-server directory service protocol used for distributing system configuration files. It is formally known as Yellow Pages.

Command to check if  NIS is installed or not:

dpkg -s nis

Recommendation: Remove the package as it is an insecure system that has been vulnerable to attacks like DOS, buffer overflows and has poor authentication in terms of querying NIS maps.

apt purge nis


10. HTTP Proxy Server
-it is a server application that acts as an intermediary for clients requests seeking resources from servers. It can cache data to speed up common HTTP requests. The standard proxy server used in many distributions is the “Squid”.

Command to check if  Squid is installed or not:

dpkg -s squid

Recommendation: Remove the package if the servers does not act as the HTTP proxy server to reduce potential attack

apt purge squid


11. SNMP Server
– SNMP is a network-management protocol that is used to monitor network devices, collect statistics and performance.

Command to check if  SNMP server is installed or not:

dpkg -s snmpd

Recommendation: Remove the package if the servers does not act as the SNMP server.  SNMP client can keep.

apt purge snmpd

12. DHCP Server
-a network server that dynamically assigns IP addresses and other network parameters to client devices

Command to check if  DHCP server is installed or not:

dpkg -s isc-dhcp-server

Recommendation: Remove the package if the servers does not act as the DCHP server to reduce potential attack

apt purge isc-dhcp-server

13. Domain Name System (DNS) Server
-DNS is a system that translates domain names to IP addresses for computers, services or other network resources. The most common DNS server on Linux is Bind.

Command to check if  Bind server is installed or not:

dpkg -s bind9

Recommendation: Remove the package if the servers does not act as the DNS server to reduce potential attack

apt purge bind9

14. HTTP or Web Server
-is a system that uses Hypertext Transfer Protocol(HTTP) to respond on requests by cliensts over the World Wide Web. There are few web servers (Refer to Top 5 Open-Source Web Servers on Linux ) that can run on Linux that need to be audited.

Command to check if  Apache server is installed or not:

dpkg -s apache2

Recommendation: Remove the package if the servers does not act as the Web server to reduce potential attack

apt purge apache2

15. IMAP & POP3 Server
Internet Message Access Protocol (IMAP) Server or IMAP is an email protocol for retrieving and managing emails from the receiving server. It stores message on the server and synchronizes across multiple devices

Command to check if  IMAP server is installed or not:

dpkg -s dovecot-imapd

Recommendation: Remove the package if the servers does not act as the IMAP server to reduce potential attack

apt purge dovecot-imapd

Post Office Protocol (POP3) Server
-3 stands for the latest version. It  is an email protocol for retrieving and managing emails from the receiving server. but compares to IMAP, it downloads email from a server to a single computer then deletes email from the server.

Command to check if  POP3 server is installed or not:

dpkg -s dovecot-pop3d

Recommendation: Remove the package if the servers does not act as the POP3 server to reduce potential attack

apt purge dovecot-pop3d


Honorable Mention:

Rsync Service
– it is used to synchronize files between seems locally or over network links.

Command to check if  Rsync service is installed or not:

dpkg -s rsync

Recommendation: Remove the package if rysnc is not being used as it uses unencrypted protocols for communication to reduce attack area.

apt purge rsync

The post Top 15 Services to Remove for Securing Ubuntu Linux appeared first on Free Linux Tutorials.
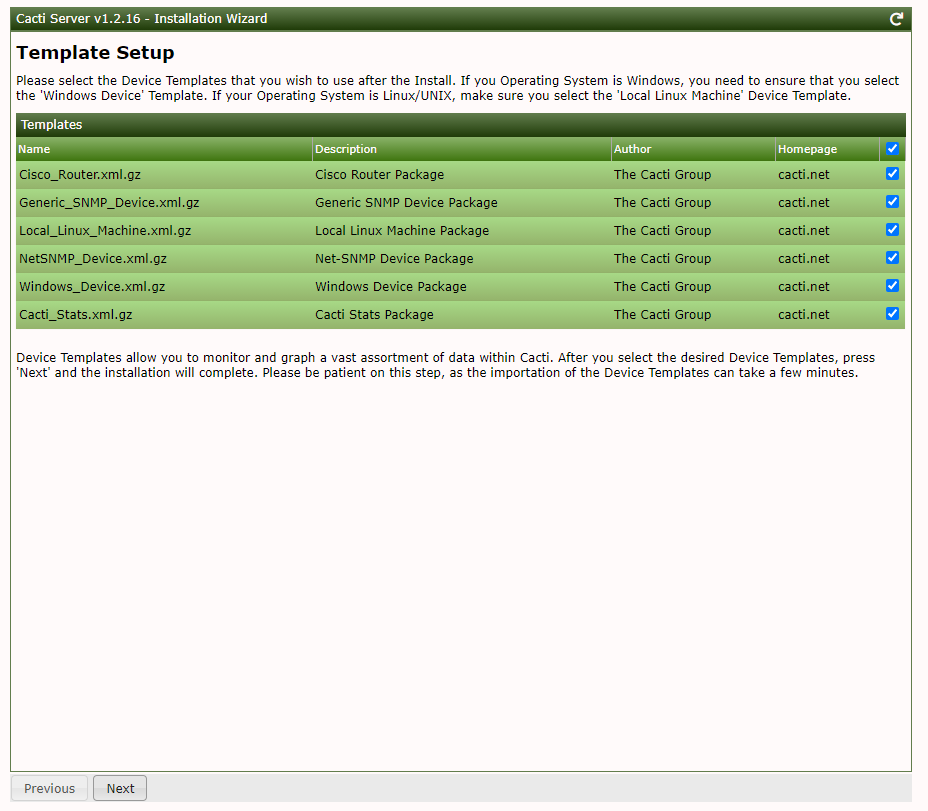
Top 6 Service Clients to remove for Securing Ubuntu Linux

$
0
0

As part of Best Security Practices, it is recommended to remove service clients that are not required for normal operation to reduce local attack. Here are the following programs or clients that need to remove. (Not in particular order)

1.NIS Client
-it is used to bind a machine to NIS server, and receive the distributed config files. NIC is an insecure system and can be vulnerable to attacks like DOS, buffer overflows. It has poor authentication mechanism as well.

Command to verify if NIS is installed or not:

dpkg -s nis

Recommendation: to remove nis package

apt purge nis

2. Talk client
-it will allow initialization of talk sessions. Talk package uses an unencrypted communications protocol.

Command to verify if talk is installed or not:

dpkg -s talk

Recommendation: to remove talk package

apt purge talk

3. Telnet Client
-it allows users to establish connections to other systems via the telnet protocol. It is insecure and and not encrypted, meaning it could allow unauthorized users to steal credentials.
Note: Some users required telnet for testing and troubleshooting,e.g. if ports are open, so this depends on the environment and requirement.

Command to verify if telnet is installed or not:

dpkg -s telnet

Recommendation: to remove telnet

apt purge telnet

4. Lightweight Directory Access Protocol (LDAP) client
-LDAP provides a method of looking up information from a central database, and was a replacement to NIS.

Command to verify if LDAP client is installed or not:

dpkg -s ldap-utils

Recommendation: to remove LDAP client to reduce potential attack area

apt purge ldap-utils

5.Remote Procedure Call (RPC) client
– RPC is a method for creating low level client-server applications across different system archictectures, and it requires an RPC-compliant client for listening on network ports.

Command to verify if RPC client is installed or not:

dpkg -s rpbcind

Recommendation: to remove the supporting package “rpcbind” to reduce potential attack area

apt purge rpbcind

6. Remote Shell (RSH) client
-RSH is a program for remotely running command on remote computer which has been superceded by ssh.

Command to verify if rsh-client is installed or not:

dpkg -s rsh-client

Recommendation: to remove the rsh-client as it contains several security exposures and have been replaced with more secure program (SSH).

apt purge rsh-client

The post Top 6 Service Clients to remove for Securing Ubuntu Linux appeared first on Free Linux Tutorials.


Securing Ubuntu Linux with Sysctl

$
0
0

Sysctl is a tool to configure or modify kernel parameters at runtime. It is a way to fine tune the kernel, of course without the need to rebuild the kernel.

Sample Options:

Write variable from the command line (instead of editing the /etc/sysctl.conf file)

sysctl -w variable=value

Force to reload new configuration in /etc/sysctl.conf (without reboot).  It is for persistent configuration

sysctl -p

Load settings from all system configuration files below:
/run/sysctl.d/*.conf
/etc/sysctl.d/*.conf
/usr/local/lib/sysctl.d/*.conf
/usr/lib/sysctl.d/*.conf
/lib/sysctl.d/*.conf
/etc/sysctl.conf

sysctl –system


These are the following  Network Parameters recommendation for Sysctl. It can be found under the /etc/sysctl.conf file

1. ICMP Send Redirects should be disabled
-this is used to send routing information to other system or hosts. If your server does not act as the router, then send redirects should be disabled.

Execute these following commands to verify:

sysctl net.ipv4.conf.all.send_redirects
sysctl net.ipv4.conf.default.send_redirects
grep “net\.ipv4\.conf\.all\.send_redirects” /etc/sysctl.conf /etc/sysctl.d/*
grep “net\.ipv4\.conf\.default\.send_redirects” /etc/sysctl.conf /etc/sysctl.d/*

Recommendation: Set it to disable or 0 for the /etc/sysctl.conf or /etc/sysctl.d/* files

sysctl -w net.ipv4.conf.all.send_redirects=0
sysctl -w net.ipv4.conf.default.send_redirects=0
sysctl -w net.ipv4.route.flush=1

2. ICMP Redirects should be disabled
-this is used to inform host/s of a more optimal route or alternate path through a network.

Execute these following commands to verify:

sysctl net.ipv4.conf.all.accept_redirects
sysctl net.ipv4.conf.default.accept_redirects
grep “net\.ipv4\.conf\.all\.accept_redirects” /etc/sysctl.conf /etc/sysctl.d/*
grep “net\.ipv4\.conf\.default\.accept_redirects” /etc/sysctl.conf /etc/sysctl.d/*

Recommendation: Set it to disable or 0 for the /etc/sysctl.conf or /etc/sysctl.d/* files as it can be used maliciously for attacks, can alter the routing tables and send packets to incorrect networks.

sysctl -w net.ipv4.conf.all.accept_redirects=0
sysctl -w net.ipv4.conf.default.accept_redirects=0
sysctl -w net.ipv4.route.flush=1

3. ICMP Secure Redirects should be disabled
-same as ICMP redirects, but it comes from gateways listed on the default gateway list.

Execute these following commands to verify:

sysctl net.ipv4.conf.all.secure_redirects
sysctl net.ipv4.conf.default.secure_redirects
grep “net\.ipv4\.conf\.all\.secure_redirects” /etc/sysctl.conf /etc/sysctl.d/*
grep “net\.ipv4\.conf\.default\.secure_redirects” /etc/sysctl.conf /etc/sysctl.d/*

Recommendation: Set it to disable or 0 for the /etc/sysctl.conf or /etc/sysctl.d/* files to protect system from routing table updates from compromised known gateways.

sysctl -w net.ipv4.conf.all.secure_redirects=0
sysctl -w net.ipv4.conf.default.secure_redirects=0
sysctl -w net.ipv4.route.flush=1

4. IP Forwarding should be disabled
-this is used to inform the system whether packet/s can be forwarded or not.

Execute these following commands to verify:

sysctl net.ipv4.ip_forward
grep -E -s “^\s*net\.ipv4\.ip_forward\s*=\s*1” /etc/sysctl.conf /etc/sysctl.d/*.conf /usr/lib/sysctl.d/*.conf /run/sysctl.d/*.conf

Recommendation: Set it to disable or 0 for the /etc/sysctl.conf or /etc/sysctl.d/* files

sysctl -w net.ipv4.ip_forward=0
sysctl -w net.ipv4.route.flush=1

5. Source Routed packets are not allowed
-source routing permits a sender to specify where the route packets take through the network.

Execute these following commands to verify:

 sysctl net.ipv4.conf.all.accept_source_route
sysctl net.ipv4.conf.default.accept_source_route
grep “net\.ipv6\.conf\.all\.accept_source_route” /etc/sysctl.conf /etc/sysctl.d/*
grep “net\.ipv6\.conf\.default\.accept_source_route” /etc/sysctl.conf /etc/sysctl.d/*

Recommendation: Set it to disable or 0 for the system not to accept source routed packets.

sysctl -w net.ipv4.conf.all.accept_source_route=0
sysctl -w net.ipv4.conf.default.accept_source_route=0 
sysctl -w net.ipv4.route.flush=1

6.  Broadcast ICMP requests should be ignored
-pinging broadcast address via ICMP echo messsages to find hosts on the network

Execute these following commands to verify:

sysctl net.ipv4.icmp_echo_ignore_broadcasts
grep “net\.ipv4\.icmp_echo_ignore_broadcasts” /etc/sysctl.conf /etc/sysctl.d/*

Recommendation: Set it to enable or 1 to ignore ICMP echo requests to broadcast. This will prevent like Smurf attacks

sysctl -w net.ipv4.icmp_echo_ignore_broadcasts=1
sysctl -w net.ipv4.route.flush=1

7. Reverse Path Filtering should be enabled
-it determines if the received packet is valid or not. This is equivalent of uRPF or Unicast Reverse Path Filtering in Networking world

Execute these following commands to verify:

sysctl net.ipv4.conf.all.rp_filter
sysctl net.ipv4.conf.default.rp_filter
grep “net\.ipv4\.conf\.all\.rp_filter” /etc/sysctl.conf /etc/sysctl.d/*
grep “net\.ipv4\.conf\.default\.rp_filter” /etc/sysctl.conf /etc/sysctl.d/*

Recommendation: Set it to enable or 1 to enable reverse path filtering

sysctl -w net.ipv4.conf.all.rp_filter=1
sysctl -w net.ipv4.conf.default.rp_filter=1
sysctl -w net.ipv4.route.flush=1

8. Bogus ICMP Error Responses should be ignored

Execute these following commands to verify:

sysctl net.ipv4.icmp_ignore_bogus_error_responses
grep “net.ipv4.icmp_ignore_bogus_error_responses” /etc/sysctl.conf /etc/sysctl.d/*

Recommendation: Set it to enable or 1 to prevent from logging bogus ICMP error responses as it will fill up your logs

sysctl -w net.ipv4.icmp_ignore_bogus_error_responses=1
sysctl -w net.ipv4.route.flush=1

9. IPv6 Router Advertisements (RAs)should not be accepted
– IPv6 RA can be used for IPv6 auto configuration and routing

Execute these following commands to verify:

sysctl net.ipv6.conf.all.accept_ra
sysctl net.ipv6.conf.default.accept_ra
grep “net\.ipv6\.conf\.all\.accept_ra” /etc/sysctl.conf /etc/sysctl.d/*
grep “net\.ipv6\.conf\.default\.accept_ra” /etc/sysctl.conf /etc/sysctl.d/*

Recommendation: Set it to disable or 0 to not accept RAs

sysctl -w net.ipv6.conf.all.accept_ra=0
sysctl -w net.ipv6.conf.default.accept_ra=0
sysctl -w net.ipv6.route.flush=1

10.  TCP SYN Cookies should be enabled
– SYN Cookie is used to defend against SYN Flood attacks, preventing Denial of Service attacks.

Execute these following commands to verify:

sysctl net.ipv4.tcp_syncookies
grep “net\.ipv4\.tcp_syncookies” /etc/sysctl.conf /etc/sysctl.d/*

Recommendation: Set it to enable or 1

sysctl -w net.ipv4.tcp_syncookies=1
sysctl -w net.ipv4.route.flush=1

Note: The option -w  means write (can use –write also) which is use  when you want to change a sysctl setting.

The post Securing Ubuntu Linux with Sysctl appeared first on Free Linux Tutorials.
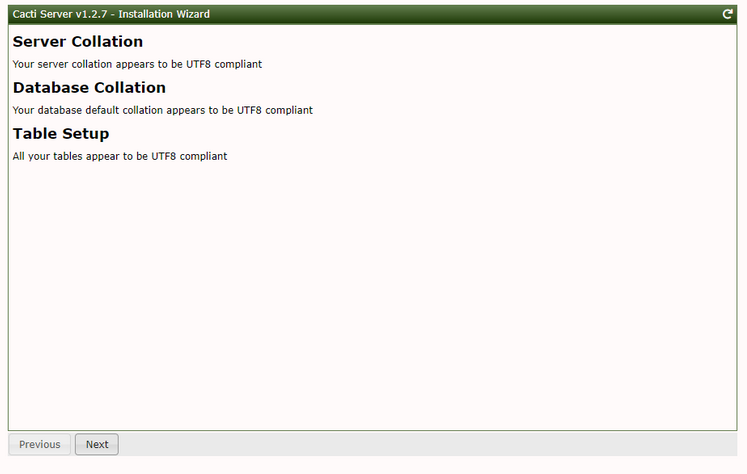
Ubuntu Security Recommendation on Logging

$
0
0

A. Install and configure Rsyslog

Rsyslog is the recommended syslog server on Linux, and has replaced the “syslogd” program. It is has better features and improvements such as TCP log transmission, encryption and can log to database.

1. Install the package

apt install rsyslog

2. Verify if rsyslog is installed

dpkg -s rsyslog

3. Verify if rsyslog is enabled

systemctl is-enabled rsyslog

If not enable, execute the commands to enable rsyslog

systemctl –now enable rsyslog

4. Configure logging
Note: Configuration file is /etc/rsyslog.conf and additional files are located under /etc/rsyslog.d/ directory

Here’s a sample configuration of /etc/rsyslog.conf

*.emerg                                          :omusrmsg:*
auth,authpriv.*                             /var/log/auth.log
mail.*                                              -/var/log/mail mail.info
mail.warning                                -/var/log/mail.warn
mail.err                                         /var/log/mail.err
news.crit                                       -/var/log/news/news.crit
news.err                                        -/var/log/news/news.err
news.notice                                 -/var/log/news/news.notice
*.=warning;*.=err                        -/var/log/warn
*.crit                                              /var/log/warn
*.*;mail.none;news.none          -/var/log/messages
local0,local1.*                              -/var/log/localmessages
local2,local3.*                              -/var/log/localmessages
local4,local5.*                             -/var/log/localmessages
local6,local7.*                             -/var/log/localmessages

Reload the configuration:

systemctl reload rsyslog

5. Set rsyslog for default file permission

Recommendation: (/etc/rsyslog.conf and /etc/rsyslog.d/*.conf)

$FileCreateMode 0640

6. Configure to accept authorized hosts
This is to provide security to only accept from authorized IPs or hosts and protect from spoofed logs.
There are 2 options for providing remote syslog reception:

a. UDP (faster but not that reliable)

Old config:

$ModLoad imudp
$UDPServerRun 514

New config:

module(load=”imudp”)
input(type=”imudp” port=”514″)

b. TCP (slower but reliable)

Old config:

$ModLoad imtcp
$InputTCPServerRun 514

New config:

module(load=”imtcp”)
input(type=”imtcp” port=”514″)

7. Configure to send logs remotely
-it is recommended to send logs to a centralised remote syslog server

Under the /etc/rsyslog.conf, add the following config

*. * @@192.168.2.254:514

where:
*.* -> to send all the logs to remote host
@@ -> directs logs to the server (can be FQDN or IP), it will use TCP
192.168.2.254 –> is the remote syslog host
514 –> port number

To take effect all the changes, restart the rsyslog process

systemctl stop rsyslog
systemctl start rsyslog


B.  Configure systemd-journald

systemd-journald is a system service that collects and stores logging data. It creates and maintains structured, indexed
journals based on logging information that is received from a variety of sources:

  • Kernel log messages, via kmsg
  • Simple system log messages, via the libc syslog(3) call
  • Structured system log messages via the native Journal API
  • Standard output and standard error of system services
  • Audit records

1. Configure journald to send logs to syslog
Under the /etc/systemd/journald.conf, uncomment to enable

ForwardToSyslog=yes

2. Configure to compress large log files
Under the /etc/systemd/journald.conf, uncomment to enable

Compress=yes

3. Configure to write logs to persistent disk
This can help to protect from loss upon server reboot
Under the /etc/systemd/journald.conf, uncomment to enable

Storage=persistent


C. Configure logrotate 
Two files that need to look through as per your requirement and policy
a. /etc/logrotate.d/rsyslog
Here’s sample settings:

/var/log/syslog
{
rotate 7
daily
missingok
notifempty
delaycompress
compress
postrotate
/usr/lib/rsyslog/rsyslog-rotate
endscript
}
/var/log/mail.info
/var/log/mail.warn
/var/log/mail.err
/var/log/mail.log
/var/log/daemon.log
/var/log/kern.log
/var/log/auth.log
/var/log/user.log
/var/log/lpr.log
/var/log/cron.log
/var/log/debug
/var/log/messages
{
rotate 4
weekly
missingok
notifempty
compress
delaycompress
sharedscripts
postrotate
/usr/lib/rsyslog/rsyslog-rotate
endscript
}

b. /etc/logrotate.conf
Here’s sample settings:
# rotate log files weekly
weekly

/var/log/wtmp {
missingok
monthly
create 0664 root utmp
rotate 1
}

Note: Make sure to set the correct permissions. Under the /etc/logrotate.conf, should be “create 0640 root utmp”

The post Ubuntu Security Recommendation on Logging appeared first on Free Linux Tutorials.

Auditd Recommended Configuration on Ubuntu Linux for System Auditing

$
0
0

Here’s how to install the program “auditd” and best security practice and  recommended settings for system auditing.

1.Install the auditd

a. Verify if the package is installed or not, using the dpkg command

dpkg -s auditd audispd-plugins

b. If not installed, you will see something like “dpkg-query: package ‘auditd’ is not installed and no information is available”.

apt install auditd audispd-plugins

2. Enable the auditd

systemctl –now enable auditd

to verify, if enabled, use this command:

systemctl is-enabled auditd

3. Set the parameter on your bootloader to enable during bootup

on your /etc/default/grub, add the “audit=1″

Before:
GRUB_CMDLINE_LINUX=””

After:

GRUB_CMDLINE_LINUX=”audit=1″

To update the grub2 configuration, run this command:

update-grub

4. Configure auditd’s backlog limit

Default setting is 64 records, it is recommended to have 8192 or bigger. On your /etc/default/grub, add the:

Syntax:
audit_backlog_limit=<SIZE of BACKLOG>

GRUB_CMDLINE_LINUX=”audit_backlog_limit=8192″

To update the grub2 configuration, run this command:

update-grub

5.  Configure to keep logs when reach max file size

Under the /etc/audit/auditd.conf, set the max log file action to keep logs.

max_log_file_action = keep_logs

6.  Configure the log file size of auditd

Log will be rotated once it reaches the maximum size set in the config. The default size is 6MB and it is recommended to adjust to a bigger size if the system has free disk space.

Edit the file /etc/audit/auditd.conf, and set the max log file:

max_log_file = <XX MB>

7. Create some rules based on your requirements.

Here are some parameters that are recommended to use for more secure environment

Create the rules under the directory /etc/audit/rules.d/

a. Create time-change rules to make sure events are collected on correct date or time. Sample rule as follows:

Create the file /etc/audit/rules.d/time.rules with the following contents:

-a always,exit -F arch=b64 -S adjtimex -S settimeofday -k time-change
-a always,exit -F arch=b32 -S adjtimex -S settimeofday -S stime -k time-change
-a always,exit -F arch=b64 -S clock_settime -k time-change
-a always,exit -F arch=b32 -S clock_settime -k time-change -w /etc/localtime -p wa -k time-change

b. Create system-locale rules to record changes to network files or system calls

Create the rules under the directory /etc/audit/rules.d/

Create the file /etc/audit/rules.d/system-locale.rules with the following contents:

For 32-bit system:

-a always,exit -F arch=b32 -S sethostname -S setdomainname -k system-locale
-w /etc/issue -p wa -k system-locale
-w /etc/issue.net -p wa -k system-locale
-w /etc/hosts -p wa -k system-locale
-w /etc/network -p wa -k system-locale

For 64-bit system:

-a always,exit -F arch=b64 -S sethostname -S setdomainname -k system-locale
-a always,exit -F arch=b32 -S sethostname -S setdomainname -k system-locale
-w /etc/issue -p wa -k system-locale
-w /etc/issue.net -p wa -k system-locale
-w /etc/hosts -p wa -k system-locale
-w /etc/network -p wa -k system-locale

c. Create identity rules to record user related information, e.g. username, passwords, group

Create the rules under the directory /etc/audit/rules.d/

Create the file /etc/audit/rules.d/identity.rules with the following contents:

-w /etc/group -p wa -k identity
-w /etc/passwd -p wa -k identity
-w /etc/gshadow -p wa -k identity
-w /etc/shadow -p wa -k identity
-w /etc/security/opasswd -p wa -k identity

d. Create login rules to record login and logout events.

Create the rules under the directory /etc/audit/rules.d/

Create the file /etc/audit/rules.d/logins.rules with the following contents:

-w /var/log/faillog -p wa -k logins
-w /var/log/lastlog -p wa -k logins
-w /var/log/tallylog -p wa -k logins

e. Create permission mode rules to monitor file attributes, ownership and permission changes

Create the rules under the directory /etc/audit/rules.d/

Create the file /etc/audit/rules.d/permissions.rules with the following contents:

For 32-bit system:

-a always,exit -F arch=b32 -S chmod -S fchmod -S fchmodat -F auid>=1000 -F auid!=4294967295 -k perm_mod
-a always,exit -F arch=b32 -S chown -S fchown -S fchownat -S lchown -F auid>=1000 -F auid!=4294967295 -k perm_mod
-a always,exit -F arch=b32 -S setxattr -S lsetxattr -S fsetxattr -S removexattr -S lremovexattr -S fremovexattr -F auid>=1000 -F auid!=4294967295
-k perm_mod

For 64-bit system:

-a always,exit -F arch=b64 -S chmod -S fchmod -S fchmodat -F auid>=1000 -F auid!=4294967295 -k perm_mod
-a always,exit -F arch=b32 -S chmod -S fchmod -S fchmodat -F auid>=1000 -F auid!=4294967295 -k perm_mod
-a always,exit -F arch=b64 -S chown -S fchown -S fchownat -S lchown -F auid>=1000 -F auid!=4294967295 -k perm_mod
-a always,exit -F arch=b32 -S chown -S fchown -S fchownat -S lchown -F auid>=1000 -F auid!=4294967295 -k perm_mod
-a always,exit -F arch=b64 -S setxattr -S lsetxattr -S fsetxattr -S removexattr -S lremovexattr -S fremovexattr -F auid>=1000 -F auid!=4294967295
-k perm_mod
-a always,exit -F arch=b32 -S setxattr -S lsetxattr -S fsetxattr -S removexattr -S lremovexattr -S fremovexattr -F auid>=1000 -F auid!=4294967295
-k perm_mod

f. Create file-change rules to monitor file renaming or deletion.

Create the rules under the directory /etc/audit/rules.d/

Create the file /etc/audit/rules.d/file-change.rules with the following contents:

For 32-bit system:

-a always,exit -F arch=b32 -S unlink -S unlinkat -S rename -S renameat -F auid>=1000 -F auid!=4294967295 -k delete

For 64-bit system:

-a always,exit -F arch=b64 -S unlink -S unlinkat -S rename -S renameat -F auid>=1000 -F auid!=4294967295 -k delete
-a always,exit -F arch=b32 -S unlink -S unlinkat -S rename -S renameat -F auid>=1000 -F auid!=4294967295 -k delete

g. Create scope rules to monitor scope changes particularly the /etc/sudoers file

Create the rules under the directory /etc/audit/rules.d/

Create the file /etc/audit/rules.d/scope.rules with the following contents:

-w /etc/sudoers -p wa -k scope
-w /etc/sudoers.d/ -p wa -k scope

g. Create sudo rules to monitor the administrators with temporary elevated privileges

Create the rules under the directory /etc/audit/rules.d/

Create the file /etc/audit/rules.d/sudo.rules with the following contents:

For 32-bit system:

-a exit,always -F arch=b32 -C euid!=uid -F euid=0 -Fauid>=1000 -F auid!=4294967295 -S execve -k actions

For 64-bit system:

-a always,exit -F arch=b64 -C euid!=uid -F euid=0 -Fauid>=1000 -F auid!=4294967295 -S execve -k actions
-a always,exit -F arch=b32 -C euid!=uid -F euid=0 -Fauid>=1000 -F auid!=4294967295 -S execve -k actions

h. Create modules rules to monitor for any loading and unloading of kernel modules using the insmod,rmmod or modprobe commands.

Create the rules under the directory /etc/audit/rules.d/

Create the file /etc/audit/rules.d/modules.rules with the following contents:

For 32-bit system:

-w /sbin/insmod -p x -k modules
-w /sbin/rmmod -p x -k modules
-w /sbin/modprobe -p x -k modules
-a always,exit -F arch=b32 -S init_module -S delete_module -k modules

For 64-bit system:

-w /sbin/insmod -p x -k modules
-w /sbin/rmmod -p x -k modules
-w /sbin/modprobe -p x -k modules
-a always,exit -F arch=b64 -S init_module -S delete_module -k modules

Note: To take effect the changes, it needs reloading the config or system reboot

Options:
-l ( auditctl -l) –> List all rules 1 per line
-e [0,1,2] (audtictl -e) where:
0 = temporarily disable auditing
1= enable auditing
2 = lock the audit configuration

Sample:

tux@freelinux:~$ sudo auditctl -e 1 /etc/audit/rules.d/logins.rules
[sudo] password for tux:
parameter passed without an option given

If rule is activated, you can see from your /var/log/audit/audit.log file

type=USER_LOGIN msg=audit(1618394064.654:214583): pid=7256 uid=0 auid=1001 ses=55349 msg=’op=login id=1001 exe=”/usr/sbin/sshd” hostname=192.168.10.105 addr=192.168.10.105 terminal=/dev/pts/9 res=success’

The post Auditd Recommended Configuration on Ubuntu Linux for System Auditing appeared first on Free Linux Tutorials.
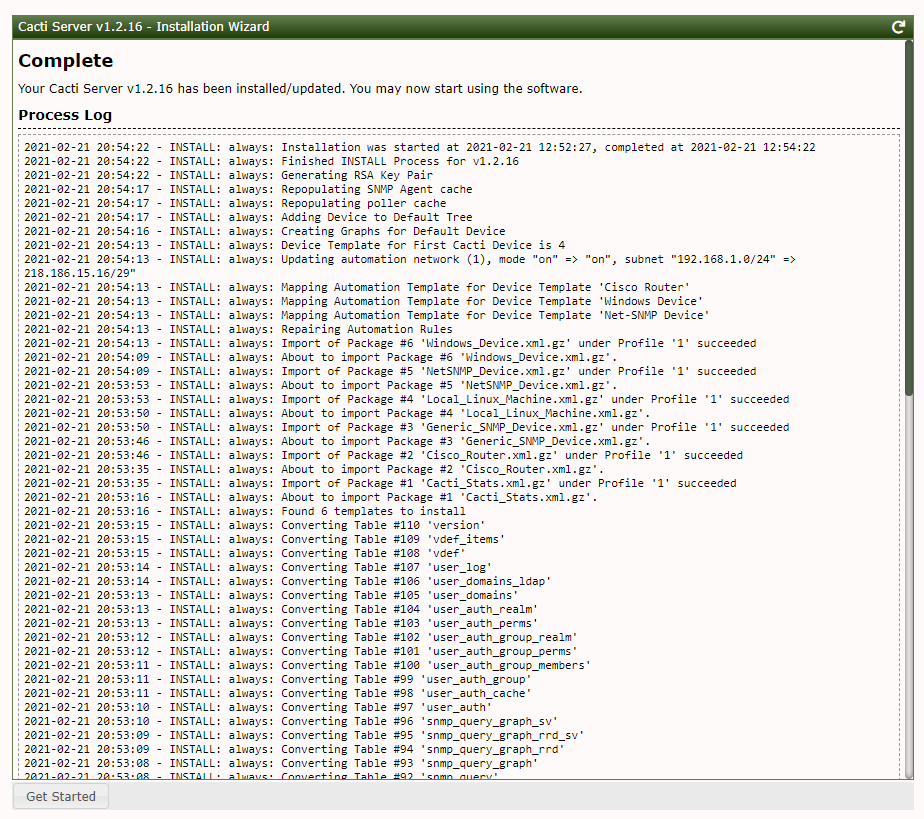
Top 20 Recommended SSH Configuration on Ubuntu Linux

$
0
0

Secure Shell or SSH is a cryptographic network protocol used to securely log or access to remote systems. The most popular tool is the OpenSSH which provides a large suite of secure tunneling capabilities and different authentication methods.

Installation:

apt install openssh-server

If there’s any configuration changes on sshd configuration (/etc/ssh/sshd_config), reload the config to take effect.

systemctl reload sshd

You can use the “-T” options to check the validity of the configuration file

sshd -T

Best Security Practice Configuration for /etc/ssh/sshd_config

1. Root Login is disabled
-don’t permit login via SSH to use root, instead to access using individual account. Then if need to escalate to root access, use “sudo” or “su”

PermitRootLogin no

2. Disable Empty passwords

PermitEmptyPasswords no

3. Set the appropriate Log Level
-set to INFO to record login activity of users accessing the SSH.

LogLevel INFO

4. Client Alive Interval should be configured
-sets the timeout interval (in seconds) wherein sshd will send a message to request a response from client if no data has been received. Recommended settings is 5 minutes.

ClientAliveInterval  300

5. Client Alive Count Max should be configured
-sets the number of client alive messages which may be sent without receiving messages back from the client. Recommended setting is 3

ClientAliveCountMax 3

6. X11 Forwarding should be disabled
-if servers do not have GUI or X window system installed, this must be disabled to reduce potential risks

X11Forwarding no

7. Maximum Authentication Attempts should be limited
– recommended to set to 4 as maximum login authentication attempts  per connection

MaxAuthTries 4

8. IgnoreRhosts should be enabled
– .rhosts and .shosts files will not be used in HostBasedAuthentication or RhostsRSAAuthentication

IgnoreRhosts yes

9. HostBasedAuthentication should be disabled
-this will disable to use .rhosts files

HostbasedAuthentication no

10. PermitUserEnvironment should be disabled
-this option should be disable to prevent users of bypassing security controls

PermitUserEnvironment no

11. Strong ciphers should be used
-the ciphers to be used for authentication should be strong.

Avoid weak ciphers like the Cipher Block Chaining (CBC) and 3 Des
aes128-cbc
aes192-cbc
aes256-cbc
3des-cbc

Instead,use strong ciphers like
aes256-ctr
aes192-ctr
aes128-ctr

Ciphers chacha20-poly1305@openssh.com,aes256-gcm@openssh.com,aes128-gcm@openssh.com,aes256-ctr,aes192-ctr,aes128-ctr

12. Login Grace Time is set
-it sets the time allowed for successful authentication. Recommended setting is 1 minute (60 secs)

LoginGraceTime 60

13.  Warning Banner is configured
– it will set to show banner or contents to the user before authentication is allowed.  You can set the /etc/issue.net as the banner

Banner /etc/issue.net

14.  Pluggable Authentication Module (PAM) is enabled
– enables PAM authentication

UsePAM yes

15.  Allow TCP Forwarding is disabled
-it is used in SSH for tunneling application ports, so it is advisable to disable to reduce security risks and backdoors

AllowTcpForwarding no

16.  Max Sessions is set
– it sets the maximum number of open sessions allowed from a given connection.  Recommended setting is not more than 10.

MaxSessions 10

17.  MaxStartups is configured
-it sets the maximum number of unauthenticated connections.

MaxStartups 10:30:100

18. Access is limited
– limit users and group that can access the system.

AllowUsers <userlist>
AllowGroups <grouplist>
DenyUsers <userlist>
DenyGroups <grouplist>

19.  Strong key exchange algorithms should be used
– keys are exchanged during communication between the sender and receiver

KexAlgorithms curve25519-sha256,curve25519-sha256@libssh.org,diffie-hellman-group14-sha256,diffie-hellman-group16-sha512,diffie-hellman-group18-sha512,ecdh-sha2-nistp521,ecdh-sha2-nistp384,ecdh-sha2-nistp256,diffie-hellman-group-exchange-sha256

Avoid weak key exchange algorithms such as:
diffie-hellman-group1-sha1
diffie-hellman-group14-sha1
diffie-hellman-group-exchange-sha1

20.  Strong Message Authentication Codes (MAC) algorithm should be used
–  strong MAC algorithm should be used in SSH communication

MACs umac-64-etm@openssh.com,umac-128-etm@openssh.com,hmac-sha2-256-etm@openssh.com,hmac-sha2-512-etm@openssh.com,hmac-sha1-etm@openssh.com,umac-64@openssh.com,umac-128@openssh.com,hmac-sha2-256,hmac-sha2-512,hmac-sha1

Avoid using weak MAC algorithms such as:
hmac-md5
hmac-md5-96
hmac-ripemd160 hmac-sha1
hmac-sha1-96
umac-64@openssh.com
umac-128@openssh.com
hmac-md5-etm@openssh.com
hmac-md5-96-etm@openssh.com
hmac-ripemd160-etm@openssh.com
hmac-sha1-etm@openssh.com
hmac-sha1-96-etm@openssh.com
umac-64-etm@openssh.com
umac-128-etm@openssh.com

Share

The post Top 20 Recommended SSH Configuration on Ubuntu Linux first appeared on Free Linux Tutorials.

Uncomplicated Firewall (UFW) Recommended Configuration on Ubuntu Linux

$
0
0

Uncomplicated Firewall (UFW)
-frontend for iptables and is a program for managing a netfilter firewall.

Some key things to consider:

1. Installation:

apt install ufw

2. Verify if ufw is enabled:

systemctl is-enabled ufw

3. Enabling the ufw will flush its chains and may result of disconnection with sessions like SSH.  So when working remotely,  it is recommended to allow SSH or port 22 first before enabling it.

ufw allow proto tcp from any to any port 22

Enable the ufw:

ufw enable

4. Take note that there’s a chance of conflict if running both ufw and the iptables-persistent package, so it is recommended to remove it.

apt purge iptables-persistent

5.  Loopback interface is allowed to accept traffic. Other interfaces should be configured to deny traffic to the loopback network:

IPv4: 127.0.0.0/8
IPv6: ::1/128

Apply the rules:

ufw allow in on lo
ufw allow out from lo
ufw deny in from 127.0.0.0/8
ufw deny in from ::1

6. Outbound connections are allowed for all interfaces

ufw allow out on all

Sample Output:

root@freelinux:~# ufw allow out on all
Rule added
Rule added (v6)

root@freelinux:~# ufw status
Status: active

To Action From
— —— —-
Anywhere ALLOW OUT Anywhere on all
Anywhere (v6) ALLOW OUT Anywhere (v6) on all

7. Allow only open ports that are needed

There are few ways to verify open or listening ports, e.g. using “ss” command

Sample Output:

root@freelinux:~# ss -4tuln
Netid State Recv-Q Send-Q Local Address:Port Peer Address:Port
udp UNCONN 0 0 *:5355 *:*
udp UNCONN 0 0 127.0.0.53%lo:53 *:*
udp UNCONN 0 0 10.0.2.15%enp0s3:68 *:*
tcp LISTEN 0 80 127.0.0.1:3306 *:*
tcp LISTEN 0 128 *:5355 *:*
tcp LISTEN 0 128 *:22 *:*

root@freelinux:~# ufw status
Status: active

To Action From
— —— —-
22/tcp ALLOW Anywhere
22/tcp (v6) ALLOW Anywhere (v6)

Anywhere ALLOW OUT Anywhere on all
Anywhere (v6) ALLOW OUT Anywhere (v6) on all

Syntax:

ufw allow in <portnumber>/<tcp or udp protocol>

8. Default deny should be configured

The concept is to allow ports or hosts then last rule is to default deny to drop all the traffic.

For example you want to allow the following ports and services
a. allow incoming web access (http & https)
b. allow incoming SSH access
c. allow outgoing for DNS or port 53
d. allow logging
e. deny everything

ufw allow in http
ufw allow in https
ufw allow in ssh
ufw allow out 53
ufw logging on

ufw default deny incoming
ufw default deny outgoing
ufw default deny routed

Sample Output:

root@freelinux:~# ufw allow in http
Rule added
Rule added (v6)
root@freelinux:~# ufw allow in https
Rule added
Rule added (v6)
root@freelinux:~# ufw allow in ssh
Rule added
Rule added (v6)
root@freelinux:~# ufw allow out 53
Rule added
Rule added (v6)
root@freelinux:~# ufw logging on
Logging enabled

root@freelinux:~# ufw default deny incoming
Default incoming policy changed to ‘deny’
(be sure to update your rules accordingly)
root@freelinux:~# ufw default deny outgoing
Default outgoing policy changed to ‘deny’
(be sure to update your rules accordingly)
root@freelinux:~# ufw default deny routed
Default routed policy changed to ‘deny’
(be sure to update your rules accordingly)

Verify:
root@freelinux:~# ufw status
Status: active

To Action From
— —— —-
22/tcp ALLOW Anywhere
443/tcp ALLOW Anywhere
80/tcp ALLOW Anywhere
22/tcp (v6) ALLOW Anywhere (v6)
443/tcp (v6) ALLOW Anywhere (v6)
80/tcp (v6) ALLOW Anywhere (v6)

Anywhere ALLOW OUT Anywhere on all
53 ALLOW OUT Anywhere
Anywhere (v6) ALLOW OUT Anywhere (v6) on all
53 (v6) ALLOW OUT Anywhere (v6)

Share

The post Uncomplicated Firewall (UFW) Recommended Configuration on Ubuntu Linux first appeared on Free Linux Tutorials.

Viewing all 73 articles
Browse latest View live